


Android Building Blocks explains about the various building blocks of Android.
When an application is compiled, aapt generates the R class, which contains resource IDs for all the resources in the res/directory.
Intents and Intents Filters:
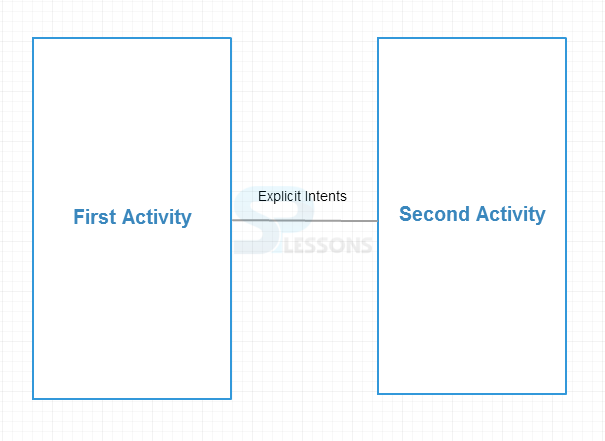
• Intents: Android Intents can be defined as simple message objects which facilitate communication between activities . Android Intents allow to navigate from one android activity to another and depict how communication and data transfer happen between different activities.It was added in API Level 1.
An Android Intent can be used to perform the following tasks :
 Implicit Intents:Implicit Android Intent is the intent where rather than defining the exact components, one can define the action that they need to perform. The decision to handle this action is left to the operating system. The OS chooses which component is best to run for implicit intents.
Whenever one needs to delegate responsibility from their application to a different application , Implicit Intents are used.
Ex:
Implicit Intents:Implicit Android Intent is the intent where rather than defining the exact components, one can define the action that they need to perform. The decision to handle this action is left to the operating system. The OS chooses which component is best to run for implicit intents.
Whenever one needs to delegate responsibility from their application to a different application , Implicit Intents are used.
Ex:
 We can also pass the data from one activity and retrieve it in a different activity.
Ex:
Pass the data:
[java]
String name="SPLessons";
int num=12;
Intent i=new Intent(FirstActivity.this,SecondActivity.class);
i.putExtra("NAME",name);
I.putExtra("NUM",num);
startActivity(i);
[/java]
OR using bundle
[java]
String name="SPLessons";
//Create the bundle
Bundle bundle = new Bundle();
//Add your data to bundle
bundle.putString("NAME", name);
//Add the bundle to the intent
i.putExtras(bundle);
startActivity(i);
[/java]
Retrieving data:
[java]
String name=getIntent().getStringExtra("NAME");
Int num=getIntent().getIntExtra("NUM",1);
[/java]
OR using bundle
[java]
Bundle bundle = getIntent().getExtras();
//Extract the data…
String name = bundle.getString("NAME");
[/java]
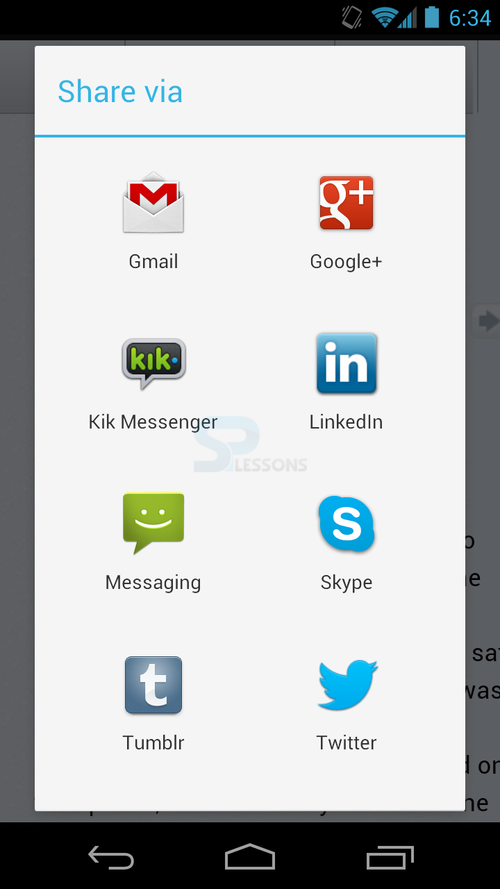
Other Examples:
Example to send an email:
[java]
String emailaddress="spl@gmail.com";
Intent email = new Intent(Intent.ACTION_SEND);
email.putExtra(Intent.EXTRA_EMAIL, emailaddress);
email.putExtra(Intent.EXTRA_SUBJECT, "subject");
email.putExtra(Intent.EXTRA_TEXT, "text to send");
email1.setType("message/rfc822");
startActivity(Intent.createChooser(email, "Choose an Email client"));
[/java]
Example to dial a phone number:
[java]
Intent phoneIntent = new Intent(Intent.ACTION_DIAL);
phoneIntent.setData(Uri.parse("tel:"+"9986734567"));
[/java]
The following permission needs to added in AndroidManifest.xml to dial a phone number
[code lang="xml"]
<uses-permission android:name="android.permission.CALL_PHONE"/>
[/code]
Example to open a browser component for a certain URL via an intent:
Here it will open facebook.com in webview:
[java]
Intent i = new Intent(Intent.ACTION_VIEW, Uri.parse("https://www.facebook.com"));
startActivity(i);
[/java]
Intent filters:
How does the Android system identify the components which can react to a certain intent?
A component can register itself via an intent filter for a specific action and specific data. An intent filter specifies the types of intents to which an activity, service, or broadcast receiver can respond to by declaring the capabilities of a component.
Android components register intent filters either statically in the AndroidManifest.xml or dynamically via code in light of a broadcast receiver . An intent filter is defined by its category, action and data filters. It can also contain additional meta-data.
If an intent is sent to the Android system, the Android platform runs a receiver determination. It uses the data included in the intent. If several components have registered for the same intent filter, the user can decide which component should be started.
Android components can be registered via intent filters for certain events. If a component does not define one, it can only be called by explicit intents.
Register an activity as browser :
[code lang="xml"]
<activity android:name=".BrowserActivitiy"
android:label="@string/app_name">
<intent-filter>
<action android:name="android.intent.action.VIEW" />
<category android:name="android.intent.category.DEFAULT" />
<data android:scheme="http"/>
</intent-filter>
</activity>
[/code]
Register an activity and call this using explicit intents:
[code lang="xml"]
<activity
android:name="yourpackagename.MainActivity"
android:label="@string/app_name" >
<intent-filter>
<action android:name="android.intent.action.MAIN" />
<category android:name="android.intent.category.DEFAULT" />
</intent-filter>
</activity>
[/code]
AndroidManifest.xml:
The AndroidManifest.xml Manifest file for an android application is a resource file which contains all the details of an application required by the android system. It is a key file that acts as a bridge between the android developer and the android platform. It helps the developer to pass on the functionality and requirements of an application to Android. This is an xml file which must be named as AndroidManifest.xml and placed at the application root. Every Android app must have an AndroidManifest.xml file. AndroidManifest.xml allows us to define,
the packages, API, libraries needed for the application, details about permissions and set of classes needed before launch and basic building blocks of an application such as activities, services, etc,.
.
Ex:
[code lang="xml"]
<?xml version="1.0" encoding="utf-8"?>
<manifest xmlns:android="http://schemas.android.com/apk/res/android"
package="yourpackagename"
android:versionCode="1"
android:versionName="1.0" >
<uses-sdk
android:minSdkVersion="8"
android:targetSdkVersion="16" />
<application
android:allowBackup="true"
android:icon="@drawable/ic_launcher"
android:label="@string/app_name"
android:theme="@style/AppTheme" >
<activity android:name="yourpackagename.MainActivity"
android:label="@string/app_name" >
<intent-filter>
<action android:name="android.intent.action.MAIN" />
<category android:name="android.intent.category.LAUNCHER" />
</intent-filter>
</activity>
</application>
</manifest>
[/code]
Android Virtual Device(AVD):
An Android Virtual Device (AVD) is an emulator configuration that allows developers to test the application by simulating the real device capabilities. Configure the AVD by specifying the hardware and software options. AVD manager enables an easy way of creating and managing the AVD with its graphical interface. One can create as many AVDs as desired, based on the type of the device to be tested for.
We can also pass the data from one activity and retrieve it in a different activity.
Ex:
Pass the data:
[java]
String name="SPLessons";
int num=12;
Intent i=new Intent(FirstActivity.this,SecondActivity.class);
i.putExtra("NAME",name);
I.putExtra("NUM",num);
startActivity(i);
[/java]
OR using bundle
[java]
String name="SPLessons";
//Create the bundle
Bundle bundle = new Bundle();
//Add your data to bundle
bundle.putString("NAME", name);
//Add the bundle to the intent
i.putExtras(bundle);
startActivity(i);
[/java]
Retrieving data:
[java]
String name=getIntent().getStringExtra("NAME");
Int num=getIntent().getIntExtra("NUM",1);
[/java]
OR using bundle
[java]
Bundle bundle = getIntent().getExtras();
//Extract the data…
String name = bundle.getString("NAME");
[/java]
Other Examples:
Example to send an email:
[java]
String emailaddress="spl@gmail.com";
Intent email = new Intent(Intent.ACTION_SEND);
email.putExtra(Intent.EXTRA_EMAIL, emailaddress);
email.putExtra(Intent.EXTRA_SUBJECT, "subject");
email.putExtra(Intent.EXTRA_TEXT, "text to send");
email1.setType("message/rfc822");
startActivity(Intent.createChooser(email, "Choose an Email client"));
[/java]
Example to dial a phone number:
[java]
Intent phoneIntent = new Intent(Intent.ACTION_DIAL);
phoneIntent.setData(Uri.parse("tel:"+"9986734567"));
[/java]
The following permission needs to added in AndroidManifest.xml to dial a phone number
[code lang="xml"]
<uses-permission android:name="android.permission.CALL_PHONE"/>
[/code]
Example to open a browser component for a certain URL via an intent:
Here it will open facebook.com in webview:
[java]
Intent i = new Intent(Intent.ACTION_VIEW, Uri.parse("https://www.facebook.com"));
startActivity(i);
[/java]
Intent filters:
How does the Android system identify the components which can react to a certain intent?
A component can register itself via an intent filter for a specific action and specific data. An intent filter specifies the types of intents to which an activity, service, or broadcast receiver can respond to by declaring the capabilities of a component.
Android components register intent filters either statically in the AndroidManifest.xml or dynamically via code in light of a broadcast receiver . An intent filter is defined by its category, action and data filters. It can also contain additional meta-data.
If an intent is sent to the Android system, the Android platform runs a receiver determination. It uses the data included in the intent. If several components have registered for the same intent filter, the user can decide which component should be started.
Android components can be registered via intent filters for certain events. If a component does not define one, it can only be called by explicit intents.
Register an activity as browser :
[code lang="xml"]
<activity android:name=".BrowserActivitiy"
android:label="@string/app_name">
<intent-filter>
<action android:name="android.intent.action.VIEW" />
<category android:name="android.intent.category.DEFAULT" />
<data android:scheme="http"/>
</intent-filter>
</activity>
[/code]
Register an activity and call this using explicit intents:
[code lang="xml"]
<activity
android:name="yourpackagename.MainActivity"
android:label="@string/app_name" >
<intent-filter>
<action android:name="android.intent.action.MAIN" />
<category android:name="android.intent.category.DEFAULT" />
</intent-filter>
</activity>
[/code]
AndroidManifest.xml:
The AndroidManifest.xml Manifest file for an android application is a resource file which contains all the details of an application required by the android system. It is a key file that acts as a bridge between the android developer and the android platform. It helps the developer to pass on the functionality and requirements of an application to Android. This is an xml file which must be named as AndroidManifest.xml and placed at the application root. Every Android app must have an AndroidManifest.xml file. AndroidManifest.xml allows us to define,
the packages, API, libraries needed for the application, details about permissions and set of classes needed before launch and basic building blocks of an application such as activities, services, etc,.
.
Ex:
[code lang="xml"]
<?xml version="1.0" encoding="utf-8"?>
<manifest xmlns:android="http://schemas.android.com/apk/res/android"
package="yourpackagename"
android:versionCode="1"
android:versionName="1.0" >
<uses-sdk
android:minSdkVersion="8"
android:targetSdkVersion="16" />
<application
android:allowBackup="true"
android:icon="@drawable/ic_launcher"
android:label="@string/app_name"
android:theme="@style/AppTheme" >
<activity android:name="yourpackagename.MainActivity"
android:label="@string/app_name" >
<intent-filter>
<action android:name="android.intent.action.MAIN" />
<category android:name="android.intent.category.LAUNCHER" />
</intent-filter>
</activity>
</application>
</manifest>
[/code]
Android Virtual Device(AVD):
An Android Virtual Device (AVD) is an emulator configuration that allows developers to test the application by simulating the real device capabilities. Configure the AVD by specifying the hardware and software options. AVD manager enables an easy way of creating and managing the AVD with its graphical interface. One can create as many AVDs as desired, based on the type of the device to be tested for.
 This will be added to the AVD list. To run it, click on start.
 Or use PC emulators like Genymotion,Blue Stacks, etc.
DDMS(Dalvik Debug Monitor Server):
Android provides a debugging tool called the Dalvik Debug Monitor Server (DDMS).
To use DDMS, open DDMS -> go to Window->Open Perspective->Other, DDMS
Or use PC emulators like Genymotion,Blue Stacks, etc.
DDMS(Dalvik Debug Monitor Server):
Android provides a debugging tool called the Dalvik Debug Monitor Server (DDMS).
To use DDMS, open DDMS -> go to Window->Open Perspective->Other, DDMS
 DDMS has various elements like Devices,File Explorer,Thread,Heap,Allocation Tracker,Emulator Control,System Information etc.
aapt(Android Asset Packaging Tool):
This tool allow you to view, create, update the ZIP format document attachments (zip, jar, apk). resource files can also be compiled into a binary file.The Android Assets Packaging Tool (aapt) handles the packaging processes and produces a .apk file.
Following are the Main Components of Android:
Activity:
An Activity is an application component which is a screen with which users can interact in order to perform activities, such as clicking on a button to take a picture, dial phone, etc. Activity class is a subclass of ContextThemeWrapper. This is added in API Level 1. An application usually consists of multiple activities that are loosely bound to each other. Activities in the system are managed as an activity stack. When a new activity is started, it is placed on the top of the stack and becomes the running activity. The previous activity always remains below the new activity in the stack and does not come to the foreground until it is called again or the new activity is destroyed.
Activity Lifecycle:
DDMS has various elements like Devices,File Explorer,Thread,Heap,Allocation Tracker,Emulator Control,System Information etc.
aapt(Android Asset Packaging Tool):
This tool allow you to view, create, update the ZIP format document attachments (zip, jar, apk). resource files can also be compiled into a binary file.The Android Assets Packaging Tool (aapt) handles the packaging processes and produces a .apk file.
Following are the Main Components of Android:
Activity:
An Activity is an application component which is a screen with which users can interact in order to perform activities, such as clicking on a button to take a picture, dial phone, etc. Activity class is a subclass of ContextThemeWrapper. This is added in API Level 1. An application usually consists of multiple activities that are loosely bound to each other. Activities in the system are managed as an activity stack. When a new activity is started, it is placed on the top of the stack and becomes the running activity. The previous activity always remains below the new activity in the stack and does not come to the foreground until it is called again or the new activity is destroyed.
Activity Lifecycle:
 Declaring an Activity in AndroidManifest.xml file:
After creating an activity, declare it in AndroidManifest.xml file.
Ex:
[code lang="xml"]
<manifest xmlns:android=http://schemas.android.com/apk/res/android
<application>
<activity android:name="yourpackagename.MainActivity">
<intent-filter>
<action android:name="android.intent.action.MAIN"/>
<category android:name="android.intent.category.LAUNCHER"/>
</intent-filter>
</activity>
<activity android:name="yourpackagename.NextActivity">
<intent-filter>
<action android:name="android.intent.action.NEXTACTIVITY"/>
<category android:name="android.intent.category.DEFAULT"/>
</intent-filter>
</activity>
</application>
</manifest>
[/code]
Starting an Activity:
In the above mentioned example, since MainActivity is a LAUNCHER activity (presented to the user when launching the application for the first time) it does not require to be started by a code. But if it is required switch from one activity to another activity you need to start an activity using Intents.
You can start an activity in 2 ways:
• startActivity():Will start the activity you want to start without worrying about getting any result from new child activity started by startActivity and returning to parent activity.
Ex:
[java]
Intent i=new Intent (MainActivity.this, NextActivity.class);
startActivity(i);
[/java]
• startAcitvityForResult(): Will start another activity from your activity and expects to get some data from the newly started child activity by startAcitvityForResult() and returns the same to the parent activity.
Ex:
[java]
int k=1;
Intent i=new Intent (MainActivity.this, NextActivity.class);
startActivityForResult(i,k);
[/java]
Example:
[java]
public class MainActivity extends Activity {
@Override
public void onCreate(Bundle savedInstanceState) {
super.onCreate(savedInstanceState);
// The activity is being created.
}
@Override
protected void onRestart() {
super.onRestart();
// The activity is been stopped and restarted
}
@Override
protected void onStart() {
super.onStart();
// The activity becomes visible
}
@Override
protected void onResume() {
super.onResume();
// The activity will start interacting with the user.
}
@Override
protected void onPause() {
super.onPause();
// another activity is about to resume.
}
@Override
protected void onStop() {
super.onStop();
//activity is no longer visible to the user, because another activity has been resumed and is covering this one.
}
@Override
protected void onDestroy() {
super.onDestroy();
// The activity is about to be destroyed.
}
}
[/java]
Service:
A Service is an application component that performs long-running operations in the background and does not provide a user interface. Service class is a subclass of ContextThemeWrapper. This is added in API Level 1. Ann application component can start a service and will continue to run in the background even if the user switches to a different application. Additionally, a component can bind to a service to interact with the service and can also perform inter process communication (IPC). For example, a service might handle play music in the background or it can interact with a content provider.
Service Lifecycle:
Declaring an Activity in AndroidManifest.xml file:
After creating an activity, declare it in AndroidManifest.xml file.
Ex:
[code lang="xml"]
<manifest xmlns:android=http://schemas.android.com/apk/res/android
<application>
<activity android:name="yourpackagename.MainActivity">
<intent-filter>
<action android:name="android.intent.action.MAIN"/>
<category android:name="android.intent.category.LAUNCHER"/>
</intent-filter>
</activity>
<activity android:name="yourpackagename.NextActivity">
<intent-filter>
<action android:name="android.intent.action.NEXTACTIVITY"/>
<category android:name="android.intent.category.DEFAULT"/>
</intent-filter>
</activity>
</application>
</manifest>
[/code]
Starting an Activity:
In the above mentioned example, since MainActivity is a LAUNCHER activity (presented to the user when launching the application for the first time) it does not require to be started by a code. But if it is required switch from one activity to another activity you need to start an activity using Intents.
You can start an activity in 2 ways:
• startActivity():Will start the activity you want to start without worrying about getting any result from new child activity started by startActivity and returning to parent activity.
Ex:
[java]
Intent i=new Intent (MainActivity.this, NextActivity.class);
startActivity(i);
[/java]
• startAcitvityForResult(): Will start another activity from your activity and expects to get some data from the newly started child activity by startAcitvityForResult() and returns the same to the parent activity.
Ex:
[java]
int k=1;
Intent i=new Intent (MainActivity.this, NextActivity.class);
startActivityForResult(i,k);
[/java]
Example:
[java]
public class MainActivity extends Activity {
@Override
public void onCreate(Bundle savedInstanceState) {
super.onCreate(savedInstanceState);
// The activity is being created.
}
@Override
protected void onRestart() {
super.onRestart();
// The activity is been stopped and restarted
}
@Override
protected void onStart() {
super.onStart();
// The activity becomes visible
}
@Override
protected void onResume() {
super.onResume();
// The activity will start interacting with the user.
}
@Override
protected void onPause() {
super.onPause();
// another activity is about to resume.
}
@Override
protected void onStop() {
super.onStop();
//activity is no longer visible to the user, because another activity has been resumed and is covering this one.
}
@Override
protected void onDestroy() {
super.onDestroy();
// The activity is about to be destroyed.
}
}
[/java]
Service:
A Service is an application component that performs long-running operations in the background and does not provide a user interface. Service class is a subclass of ContextThemeWrapper. This is added in API Level 1. Ann application component can start a service and will continue to run in the background even if the user switches to a different application. Additionally, a component can bind to a service to interact with the service and can also perform inter process communication (IPC). For example, a service might handle play music in the background or it can interact with a content provider.
Service Lifecycle:
 Declaring Service in AndroidManifest.xml file:
After creating an activity, the activity has to be declared in AndroidManifest.xml file.
Ex:
[code lang="xml"]
<manifest xmlns:android=http://schemas.android.com/apk/res/android
<application>
<activity android:name="yourpackagename.MainActivity">
<intent-filter>
<action android:name="android.intent.action.MAIN"/>
<category android:name="android.intent.category.LAUNCHER"/>
</intent-filter>
</activity>
<service android:name="yourpackagename.MainService" />
</application>
</manifest>
[/code]
Example:
MainActivity.java:
[java]
public class MainActivity extends Activity {
@Override
protected void onCreate(Bundle savedInstanceState) {
super.onCreate(savedInstanceState);
setContentView(R.layout.activity_main);
}
// Start the service
public void startService(View view) {
startService(new Intent(this, MainService.class));
}
// Stop the service
public void stopService(View view) {
stopService(new Intent(this, MainService.class));
}
}
[/java]
activity_main.xml:
[code lang="xml"]
<?xml version="1.0" encoding="utf-8"?>
<RelativeLayout xmlns:android="http://schemas.android.com/apk/res/android"
xmlns:tools="http://schemas.android.com/tools"
android:layout_width="match_parent"
android:layout_height="match_parent"
android:layout_gravity="center"
android:background="#FFFFFF"
tools:context=".MainActivity" >
<TextView
android:id="@+id/textView1"
android:layout_width="wrap_content"
android:layout_height="wrap_content"
android:layout_alignParentTop="true"
android:layout_centerHorizontal="true"
android:layout_marginTop="20dp"
android:textColor="#000000"
android:text="Android-Service Example" />
<Button
android:id="@+id/button1"
android:layout_width="150dp"
android:layout_height="30dp"
android:layout_below="@+id/textView1"
android:layout_centerHorizontal="true"
android:layout_marginTop="115dp"
android:background="#009ACD"
android:onClick="startService"
android:text="Start Service" />
<Button
android:id="@+id/button2"
android:layout_width="150dp"
android:layout_height="30dp"
android:layout_alignRight="@+id/button1"
android:layout_below="@+id/button1"
android:background="#009ACD"
android:layout_marginTop="76dp"
android:onClick="stopService"
android:text="Stop Service" />
</RelativeLayout>
[/code]
MainService.java:
[java]
public class MainService extends Service {
int onStart;
IBinder onBind;
boolean onRebind;
@Override
public void onCreate() {
// The service is being created
}
@Override
public int onStartCommand(Intent intent, int flags, int startId) {
// The service is starting, due to a call to startService()
return onStart;
}
@Override
public IBinder onBind(Intent intent) {
// A client is binding to the service with bindService()
return onBind;
}
@Override
public boolean onUnbind(Intent intent) {
// All clients have unbound with unbindService()
return onRebind;
}
@Override
public void onRebind(Intent intent) {
//a client is rebinding to the service with bindService() after onUnbind() has //already been called.
}
@Override
public void onDestroy() {
// The service is no longer used and is being destroyed
}
}
[/java]
Output:
Declaring Service in AndroidManifest.xml file:
After creating an activity, the activity has to be declared in AndroidManifest.xml file.
Ex:
[code lang="xml"]
<manifest xmlns:android=http://schemas.android.com/apk/res/android
<application>
<activity android:name="yourpackagename.MainActivity">
<intent-filter>
<action android:name="android.intent.action.MAIN"/>
<category android:name="android.intent.category.LAUNCHER"/>
</intent-filter>
</activity>
<service android:name="yourpackagename.MainService" />
</application>
</manifest>
[/code]
Example:
MainActivity.java:
[java]
public class MainActivity extends Activity {
@Override
protected void onCreate(Bundle savedInstanceState) {
super.onCreate(savedInstanceState);
setContentView(R.layout.activity_main);
}
// Start the service
public void startService(View view) {
startService(new Intent(this, MainService.class));
}
// Stop the service
public void stopService(View view) {
stopService(new Intent(this, MainService.class));
}
}
[/java]
activity_main.xml:
[code lang="xml"]
<?xml version="1.0" encoding="utf-8"?>
<RelativeLayout xmlns:android="http://schemas.android.com/apk/res/android"
xmlns:tools="http://schemas.android.com/tools"
android:layout_width="match_parent"
android:layout_height="match_parent"
android:layout_gravity="center"
android:background="#FFFFFF"
tools:context=".MainActivity" >
<TextView
android:id="@+id/textView1"
android:layout_width="wrap_content"
android:layout_height="wrap_content"
android:layout_alignParentTop="true"
android:layout_centerHorizontal="true"
android:layout_marginTop="20dp"
android:textColor="#000000"
android:text="Android-Service Example" />
<Button
android:id="@+id/button1"
android:layout_width="150dp"
android:layout_height="30dp"
android:layout_below="@+id/textView1"
android:layout_centerHorizontal="true"
android:layout_marginTop="115dp"
android:background="#009ACD"
android:onClick="startService"
android:text="Start Service" />
<Button
android:id="@+id/button2"
android:layout_width="150dp"
android:layout_height="30dp"
android:layout_alignRight="@+id/button1"
android:layout_below="@+id/button1"
android:background="#009ACD"
android:layout_marginTop="76dp"
android:onClick="stopService"
android:text="Stop Service" />
</RelativeLayout>
[/code]
MainService.java:
[java]
public class MainService extends Service {
int onStart;
IBinder onBind;
boolean onRebind;
@Override
public void onCreate() {
// The service is being created
}
@Override
public int onStartCommand(Intent intent, int flags, int startId) {
// The service is starting, due to a call to startService()
return onStart;
}
@Override
public IBinder onBind(Intent intent) {
// A client is binding to the service with bindService()
return onBind;
}
@Override
public boolean onUnbind(Intent intent) {
// All clients have unbound with unbindService()
return onRebind;
}
@Override
public void onRebind(Intent intent) {
//a client is rebinding to the service with bindService() after onUnbind() has //already been called.
}
@Override
public void onDestroy() {
// The service is no longer used and is being destroyed
}
}
[/java]
Output:
 Content Providers:
Content provider creates an abstraction layer between its repository of data and external applications that are using the data. Android applications have content providers to provide data to other applications. Customized content providers can also be created to get data from database / sdcard / media etc. Content Provider is added in API Level 1.
Every application has its own id data directory and protected memory area.
Applications have to register themselves as a provider of data. Other applications can request Android to read/write the data through a fixed API. To share data use Content Providers. Content Providers use standard insert(), query(), update(), delete() methods to access application data.
Content Providers:
Content provider creates an abstraction layer between its repository of data and external applications that are using the data. Android applications have content providers to provide data to other applications. Customized content providers can also be created to get data from database / sdcard / media etc. Content Provider is added in API Level 1.
Every application has its own id data directory and protected memory area.
Applications have to register themselves as a provider of data. Other applications can request Android to read/write the data through a fixed API. To share data use Content Providers. Content Providers use standard insert(), query(), update(), delete() methods to access application data.
 App 2 stores its data in its own database. App 1 communicates with the provider to access App 2's data.
Broadcast Receiver:
Android system initiates many system-wide broadcast announcements such as "battery is low broadcasts". Android apps can also broadcast custom announcements. A broadcast is a way to send a message within an application or to a different application. A BroadcastReceiver is a component that listens and responds to the initiated broadcasts. First and foremost is to register a broadcast receiver in AndroidManifest.xml file. BroadcastReceiver is a subclass of the Object and is introduced in API Level 1.
Creating the Broadcast Receiver:
A broadcast receiver class(MainReceiver) should extend BroadcastReceiver class and should override the onReceive() which receives each message as an intent object.
[java]
public class MyBroadCastReceiver extends BroadcastReceiver{
@Override
public void onReceive(Context context, Intent intent) {
// TODO Auto-generated method stub
Toast.makeText(context, "Custom Event Received"+" "+"Message is="+intent.getStringExtra("Message"), Toast.LENGTH_SHORT).show();
}
}
[/java]
Registering Broadcast Receiver:
Register receiver by declaring in AndroidManifest.xml or by java code.
[java]
@Override
protected void onResume() {
super.onResume();
registerReceiver(new MyBroadCastReceiver(),
new IntentFilter("com.spl.CUSTOM_EVENT"));
}
[/java]
OR
[code lang="xml"]
<receiver android:name="MyBroadCastReceiver">
<intent-filter>
<action android:name="com.spl.CUSTOM_EVENT">
</action>
</intent-filter>
</receiver>
[/code]
We can also register the receiver for a system generated event
[code lang="xml"]
<receiver android:name="MyReceiver">
<intent-filter>
<action android:name="android.intent.action.BOOT_COMPLETED">
</action>
</intent-filter>
</receiver>
[/code]
The following example explains how to create a custom BroadcastReceiver.
Create MainActvity.java under src/<your packagename>
MainActvity.java:
[java]
public class MainActivity extends Activity {
@Override
protected void onCreate(Bundle savedInstanceState) {
super.onCreate(savedInstanceState);
setContentView(R.layout.activity_main);
//find view by Id
Button send=(Button)findViewById(R.id.button1);
//on click send
send.setOnClickListener(new View.OnClickListener() {
@Override
public void onClick(View v) {
// TODO Auto-generated method stub
Intent i=new Intent();
i.setAction("com.spl.CUSTOM_EVENT");
i.putExtra("Message", "Hi,How are you?");
sendBroadcast(i);
}
});
}
}
[/java]
Create activity.xml under res/layout folder
activity.xml:
[code lang="xml"]
<RelativeLayout xmlns:android="http://schemas.android.com/apk/res/android"
xmlns:tools="http://schemas.android.com/tools"
android:layout_width="match_parent"
android:layout_height="match_parent"
android:layout_gravity="center"
android:gravity="center" >
<Button
android:id="@+id/button1"
android:layout_width="wrap_content"
android:layout_height="wrap_content"
android:text="Send BroadCast"
android:background="#009ACD" />
</RelativeLayout>
[/code]
Create a BroadCastReceiver class MyBroadCastReceiver.java
MyBroadCastReceiver.java:
[java]
public class MyBroadCastReceiver extends BroadcastReceiver{
@Override
public void onReceive(Context context, Intent intent) {
// TODO Auto-generated method stub
Toast.makeText(context, "Custom Event Received"+" "+"Message is="+intent.getStringExtra("Message"), Toast.LENGTH_SHORT).show();
}
}
[/java]
AndroidManifest.xml:
[code lang="xml"]
<?xml version="1.0" encoding="utf-8"?>
<manifest xmlns:android="http://schemas.android.com/apk/res/android"
package="com.spl.myproject"
android:versionCode="1"
android:versionName="1.0" >
<uses-sdk
android:minSdkVersion="8"
android:targetSdkVersion="16" />
<application
android:allowBackup="true"
android:icon="@drawable/ic_launcher"
android:label="@string/app_name"
android:theme="@style/AppTheme" >
<activity
android:name="com.spl.myproject.MainActivity"
android:label="@string/app_name" >
<intent-filter>
<action android:name="android.intent.action.MAIN" />
<category android:name="android.intent.category.LAUNCHER" />
</intent-filter>
</activity>
<receiver android:name="MyBroadCastReceiver">
<intent-filter>
<action android:name="com.spl.CUSTOM_EVENT">
</action>
</intent-filter>
</receiver>
</application>
</manifest>
[/code]
Output:
App 2 stores its data in its own database. App 1 communicates with the provider to access App 2's data.
Broadcast Receiver:
Android system initiates many system-wide broadcast announcements such as "battery is low broadcasts". Android apps can also broadcast custom announcements. A broadcast is a way to send a message within an application or to a different application. A BroadcastReceiver is a component that listens and responds to the initiated broadcasts. First and foremost is to register a broadcast receiver in AndroidManifest.xml file. BroadcastReceiver is a subclass of the Object and is introduced in API Level 1.
Creating the Broadcast Receiver:
A broadcast receiver class(MainReceiver) should extend BroadcastReceiver class and should override the onReceive() which receives each message as an intent object.
[java]
public class MyBroadCastReceiver extends BroadcastReceiver{
@Override
public void onReceive(Context context, Intent intent) {
// TODO Auto-generated method stub
Toast.makeText(context, "Custom Event Received"+" "+"Message is="+intent.getStringExtra("Message"), Toast.LENGTH_SHORT).show();
}
}
[/java]
Registering Broadcast Receiver:
Register receiver by declaring in AndroidManifest.xml or by java code.
[java]
@Override
protected void onResume() {
super.onResume();
registerReceiver(new MyBroadCastReceiver(),
new IntentFilter("com.spl.CUSTOM_EVENT"));
}
[/java]
OR
[code lang="xml"]
<receiver android:name="MyBroadCastReceiver">
<intent-filter>
<action android:name="com.spl.CUSTOM_EVENT">
</action>
</intent-filter>
</receiver>
[/code]
We can also register the receiver for a system generated event
[code lang="xml"]
<receiver android:name="MyReceiver">
<intent-filter>
<action android:name="android.intent.action.BOOT_COMPLETED">
</action>
</intent-filter>
</receiver>
[/code]
The following example explains how to create a custom BroadcastReceiver.
Create MainActvity.java under src/<your packagename>
MainActvity.java:
[java]
public class MainActivity extends Activity {
@Override
protected void onCreate(Bundle savedInstanceState) {
super.onCreate(savedInstanceState);
setContentView(R.layout.activity_main);
//find view by Id
Button send=(Button)findViewById(R.id.button1);
//on click send
send.setOnClickListener(new View.OnClickListener() {
@Override
public void onClick(View v) {
// TODO Auto-generated method stub
Intent i=new Intent();
i.setAction("com.spl.CUSTOM_EVENT");
i.putExtra("Message", "Hi,How are you?");
sendBroadcast(i);
}
});
}
}
[/java]
Create activity.xml under res/layout folder
activity.xml:
[code lang="xml"]
<RelativeLayout xmlns:android="http://schemas.android.com/apk/res/android"
xmlns:tools="http://schemas.android.com/tools"
android:layout_width="match_parent"
android:layout_height="match_parent"
android:layout_gravity="center"
android:gravity="center" >
<Button
android:id="@+id/button1"
android:layout_width="wrap_content"
android:layout_height="wrap_content"
android:text="Send BroadCast"
android:background="#009ACD" />
</RelativeLayout>
[/code]
Create a BroadCastReceiver class MyBroadCastReceiver.java
MyBroadCastReceiver.java:
[java]
public class MyBroadCastReceiver extends BroadcastReceiver{
@Override
public void onReceive(Context context, Intent intent) {
// TODO Auto-generated method stub
Toast.makeText(context, "Custom Event Received"+" "+"Message is="+intent.getStringExtra("Message"), Toast.LENGTH_SHORT).show();
}
}
[/java]
AndroidManifest.xml:
[code lang="xml"]
<?xml version="1.0" encoding="utf-8"?>
<manifest xmlns:android="http://schemas.android.com/apk/res/android"
package="com.spl.myproject"
android:versionCode="1"
android:versionName="1.0" >
<uses-sdk
android:minSdkVersion="8"
android:targetSdkVersion="16" />
<application
android:allowBackup="true"
android:icon="@drawable/ic_launcher"
android:label="@string/app_name"
android:theme="@style/AppTheme" >
<activity
android:name="com.spl.myproject.MainActivity"
android:label="@string/app_name" >
<intent-filter>
<action android:name="android.intent.action.MAIN" />
<category android:name="android.intent.category.LAUNCHER" />
</intent-filter>
</activity>
<receiver android:name="MyBroadCastReceiver">
<intent-filter>
<action android:name="com.spl.CUSTOM_EVENT">
</action>
</intent-filter>
</receiver>
</application>
</manifest>
[/code]
Output:


The Various Android Building Blocks are:
- Views
- UI Layouts
- Fragments
- Resources
- Intents and Intent Filters
- AndroidManifest.xml
- AVD
- DDMS
- aapt
- Activities
- Services
- Content Providers
- Broadcast Receivers
Main Components Include:
- Activities
- Services
- Content Providers
- Broadcast Receivers These components are loosely coupled by the application manifest file AndroidManifest.xml that describes each component of the application and how they interact.
This class represents the basic building block for user interface components. A View is basically a screen and is primarily responsible for drawing and event handling. View is the base class for widgets, which are used to create UI components (buttons, text fields etc.). It was added in API Level 1.Click here for a detailed description.
Android Layout is the most interesting View element container in Android. To design an UI for an App, knowledge about Android Layout is required. It is also known as ViewGroup(added in API Level 1). All view elements like textbox, labels, buttons, etc. need to be contained inside the layout. The Layout is in-turn contained in a layout file location inside res/layout directory of the Android app. An Android Activity uses the Android Layout & displays the output on the screen. Click here for a detailed description.
A Fragment represents a portion of user interface in an Activity.It was added in API Level 11. Click here for a detailed description.
Resources are the additional files and static content that the code uses, which include bitmaps, layout definitions, user interface strings, animation instructions,etc.This component was added in API Level 1.One should always externalize resources such as images and strings from the application code, to maintain them independently.
One should place each type of resource in a specific subdirectory of their project's res/ directory.
MyProject/
src/
MainActivity.java
res/
anim/
animation1.xml
animation2.xml
animator/
myanimator.xml
drawable/
logo.png
menu/
main.xml
layout/
activity_main.xml
activity_info.xml
mipmap/
icon.png
values/
strings.xml
style.xml
color/
mycolor.xml
raw/
song.mp3
Resources can be accessed in code(R.string.android) as well as in xml file(@string/android)
In code:
- To access image from drawable folder – R.drawable.logo imageView.setImageResource(R.drawable.logo);
- To access xml file from layout folder – R.layout.activity_main setContentView(R.layout.activity_main);
- To access xml file from menu folder - R.menu.main getMenuInflater().inflate(R.menu.main, menu);
- To access .mp3 file from raw folder- R.raw.song MediaPlayer player=MediaPlayer.create(this, R.raw.song);
- To access xml file from anim folder-R.anim.animation overridePendingTransition(R.anim.animation1, R.anim.animation2);
1. Open another Activity or Service from the current Activity.
2. Pass data between Activities and Services.
3. To deliver a broadcast.
There are 2 types of intents:
• Explicit Intents
• Implicit Intents
Explicit Intents: Explicit Android Intent is the Intent in which one can explicitly define the component that needs to be called by an Android System.
When an activity needs to be opened from another activity in the same Android app, Explicit Intents are used. Ex:
Intent i=new Intent(FromActivity.this, ToActivity.class);
startActivity(i);
Intent i = new Intent();
i.setAction(Intent.ACTION_SEND);
i.putExtra(Intent.EXTRA_TEXT, "Text to send.");
i.setType("text/plain");
startActivity(i);
Elements of AndroidManifest.xml:
Following are the elements that can appear in AndroidManifest.xml. <action> <activity> <activity-alias> <application> <category> <data> <grant-uri-permission> <instrumentation> <intent-filter> <manifest> <meta-data> <permission> <permission-group> <permission-tree> <provider> <receiver> <service> <supports-screens> <uses-configuration> <uses-feature> <uses-library> <uses-permission> <uses-sdk>Elements for Application Properties:
uses-permission – used to specify permissions that are requested for the purpose of security. permission – used to set permissions to provide access control for some specific component of the application. permission-group – does the same as above for a set of components. permission-tree – refers to one specific name of the component which is the owner or parent of the set of components. instrumentation – enables to know the interaction between Android system and application. uses-sdk – specifies the platform compatibility of the application. uses-configuration – specifies the set of hardware and software requirements of the application. uses-feature – specifies single hardware and software requirement and their related entity. supports-screens, compatible-screens – both these tags deals with screen configuration mode and size of the screen and so on. supports-gl-texture – specifies texture based on which the application is filtered.Elements for Application Components:
These should be enclosed in <application> container. activity – has the set of attributes based on user interface. activity-alias – specifies target activities. service – has the operation provided by any library or API, running in background that is not visible. receiver – helps to the receive message broadcasted by the same application or by outside entity. provider – provides some structure to access application data. uses-library – it specifies the set of library files required to run the applicationBelow are the steps to create an AVD from AVD manager graphical interface.
1. Go to Windows ->AVD Manager and select Virtual Devices. 2. Click on New to create a Virtual Device, give it some Name and select Target Android Platform from the drop down list 3. Click “Create AVD” .Main advantages of DDMS:
1. DDMS provides port-forwarding services. 2. Screen capture on the device. 3. Thread and heap information on the device. 4. Logcat. 5. Process. 6. Radio state information. 7. Incoming call and SMS spoofing, location data spoofing, and more.An activity mainly has four states:
• Running: In this state Activity is visible and user can interact with it. • Paused: In this state Activity is still visible but partially obscured and might be killed by the system. • Stopped: In this state Activity is not visible but it still retains state and might be killed by the system. • Killed: In this state Activity has been terminated by the system and killed. This method is called when the activity is created and is used to initialize the activity.
This method is called when the activity becomes visible to the user.
This method is called when the activity starts interacting with the user.
This method is called when another activity is about to resume.
This method is called when the activity is no longer visible to the user, because another activity has been resumed and is covering this one.
This method is called before the activity is destroyed by the system.
This method is called after the activity has been stopped, prior to it being started again.
A service can take two forms:
• Started: A service is "started" when an application component starts it by calling startService(). Once started, a service can run in the background indefinitely, even when the component that started the service is destroyed. • Bound: A service is "bound" when an application component binds to it by calling bindService(). A bound service offers a client-server interface that allows components to interact with the service, send requests, get results, and even offers to do so across processes with inter process communication (IPC). A bound service runs only as long as another application component is bound to it. This method is called when the service is being created.
This method is called when the service is starting, due to a call to startService().The service can be stopped by calling stopService() method.
This method is called when a client(or activity) is binding to the service with bindService().
This method is called when all clients have unbound with unbindService().
This method is called when a client is rebinding to the service with bindService() after onUnbind() has already been called.
This method is called before the service is destroyed.
For the broadcast receiver to work, the following need to be done :
• Creating Broadcast Receiver • Registering Broadcast ReceiverSome of the system generated events are:
android.intent.action.BATTERY_CHANGED: This broadcast contains the charging state, level, and other information about the battery. android.intent.action.BATTERY_LOW: Indicates low battery condition on the device. android.intent.action.DATE_CHANGED: Indicates the date has changed. android.intent.action.BOOT_COMPLETED: This broadcasts once, after the system has finished booting. android.net.wifi.WIFI_STATE_CHANGED: Indicates the wifi state has changed