


 Introduction
This chapter demonstrate the JUnit Annotations. Which has the several basic annotations by using these user can reduce coding and extra burden from tester. JUnit Annotations are basically two types Pre Defined and User Defined. Predefined annotations are available in JUnit. In order to use the annotations user can directly import from the JUnit. User can define own methods those are the User define. Some basic annotations with examples are briefly described here.
- Types Of JUnit Annotations?
- Explain all the annotations.
Description
In order to check which are used to track the test methods working conditions on test cases. These are the some of the JUnit Annotations.
- @Test Test annotation is the creation of Test case to already developed project is known as Test.
- @Before and @After These two annotations work together to allow the user to specify some behavior that happen before and after the each test.
- @BeforeClass and @AfterClass Which allows some behavior before and after the methods in a each test class are executed.
- @Ignore This annotations simply tells to the JUnit runner to ignore this test. Then JUnit Runner will ignore the Test.
- @Test expected This annotation will expect that an Exception will be thrown in our test.
- @Test timeout Test timed out Annotation specify a period of time to execute the test.
Description
Explanation for the above JUnit Annotations is as follows.
Description
Test annotation described that which method is attach to the public void method to run as a test case in JUnit. In order to run this method JUnit initially invoked instance of a class and then invoke the @Test annotation. If any Exceptions are raised by the test those are the JUnit failures if not Test is succeeded. The below example demonstrate the use of @Test annotation.
[c]import org.junit.Test;
import com.simpleprogram.proteintracker.TrackingService;
import static org.junit.Assert.*;
public class trackingServiceeTest {
@Test
public void NewTrackingServiceTotalIsZero()
{
TrackingService service = new TrackingService();
assertEquals("Tracking service was not zero", 0, service.getTotal());
}
}
[/c]
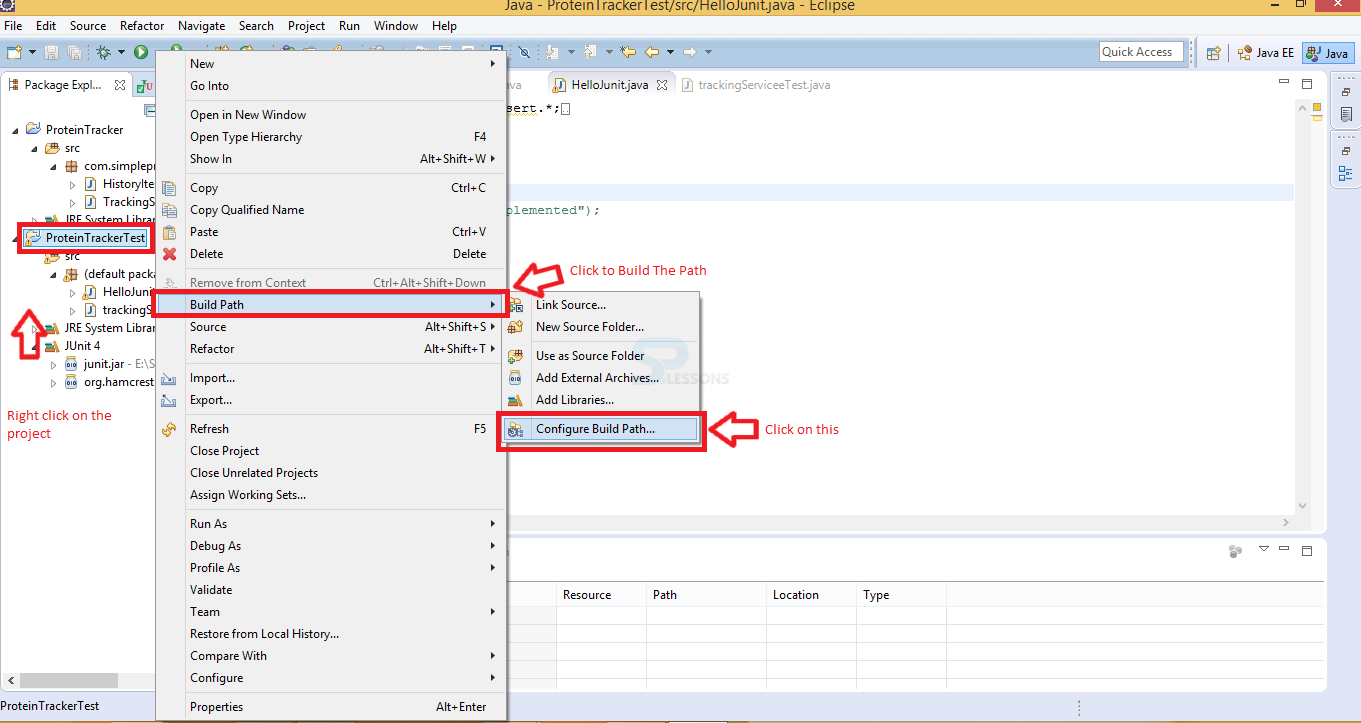
Step 1
To run this project initially programmer needs to Configure The Build Path to the created project ProteinTracker and ProteinTrackerTest.
In order to configurethe build path First right click on the project ProteinTrackerTest a Dialogue box will appear in that
select BuildPath - > Configure BuildPtah
as shown in below provided image.
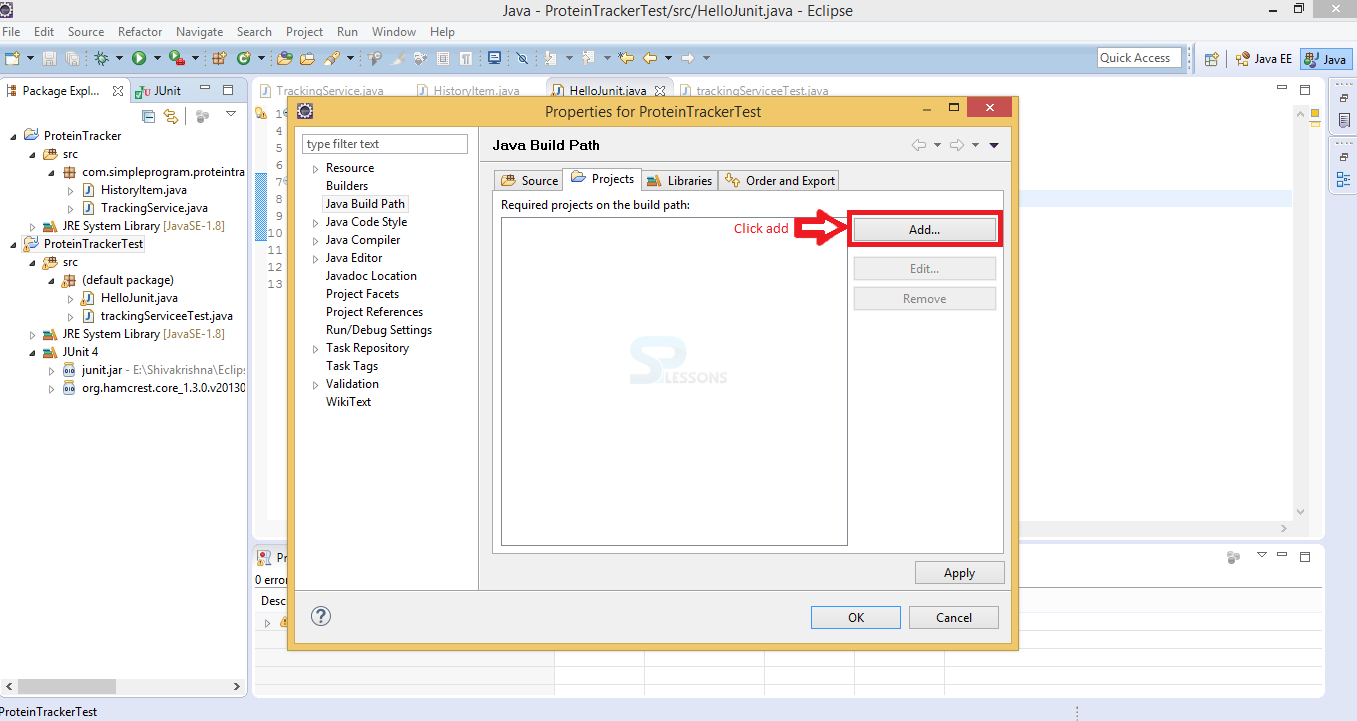
Step 2
Now another window will appear named as Properties For ProteinTrackerTest with some options in that click on Project and then select Add button.
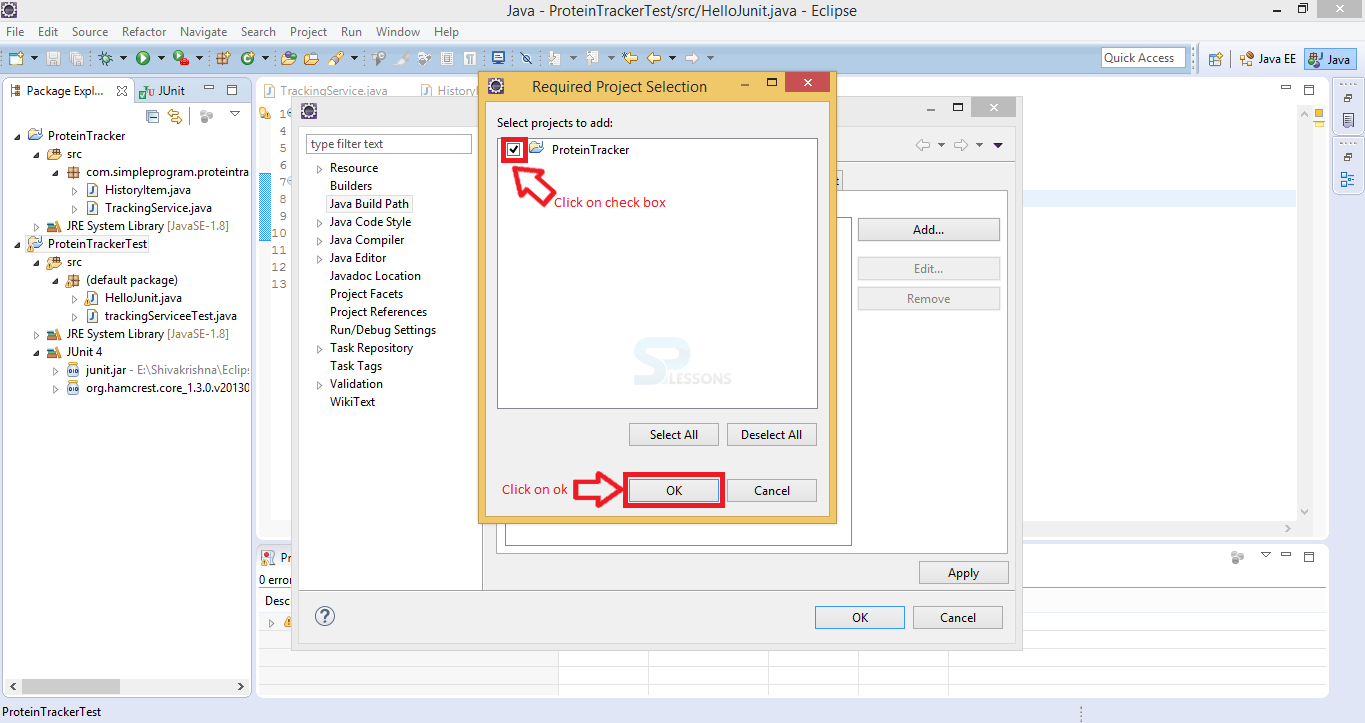
Step 3
Then another window appear named as Required Project Selection in that select the appropriate project and click on the check box provided then clock Ok.
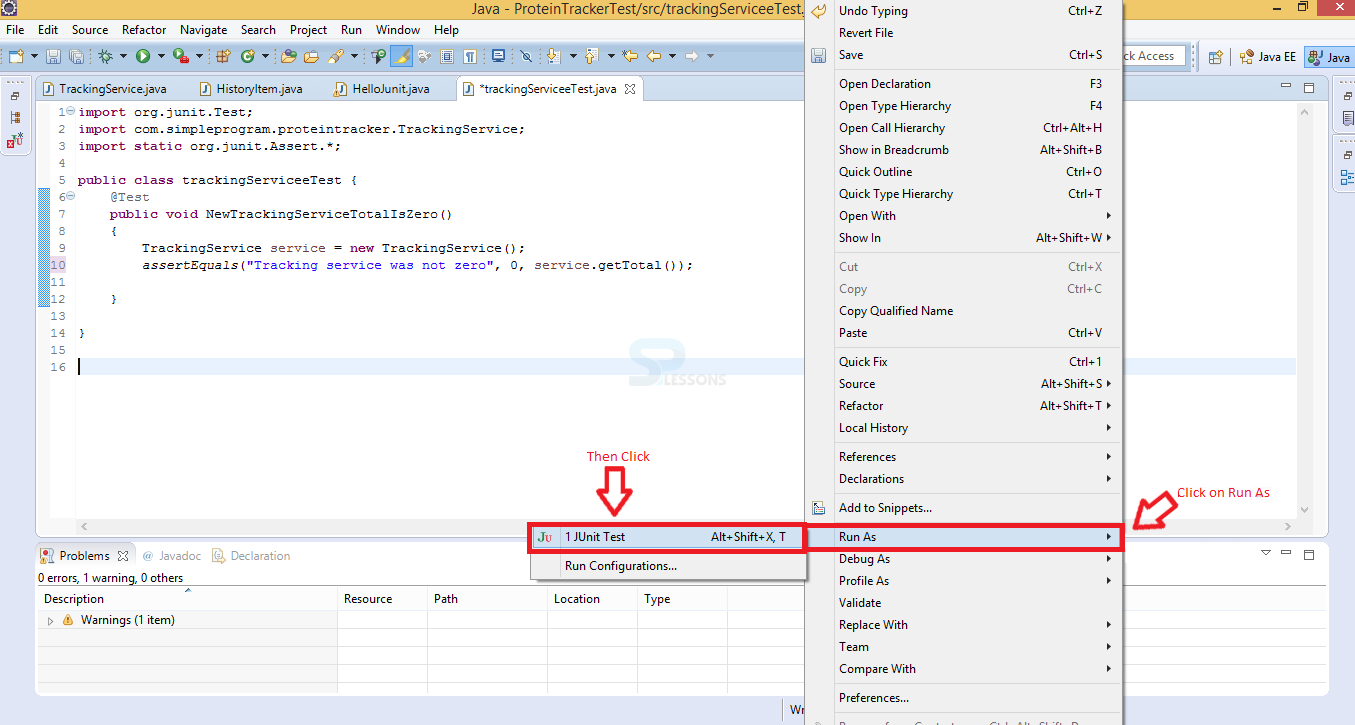
Step 4
The above visible test method can be run as by right clicking any where on Eclipse window will open a dialogue box providing some options, selecting Run As will explore another dialogue box, now select JUnit Test as shown in below image.
Step 5
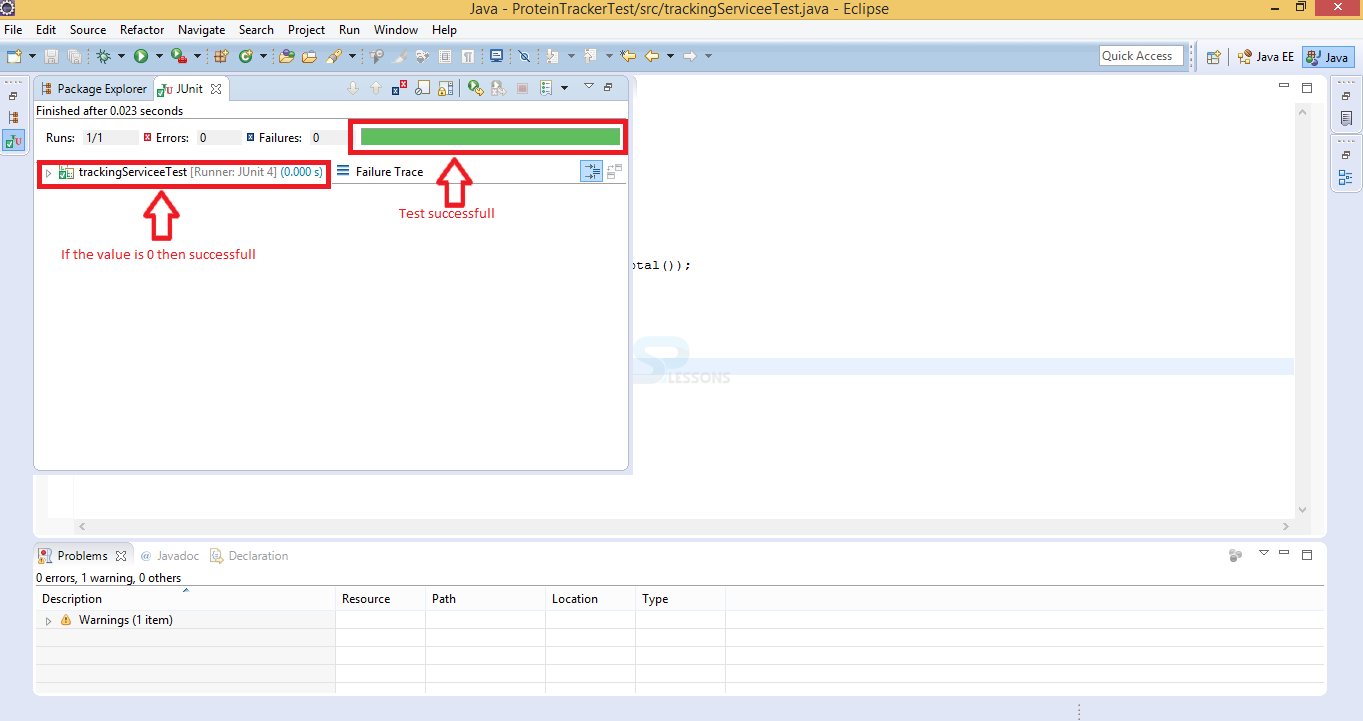
Initially the project code Tracking Service was set to zero then the test was run successfully and display the out put result with green color like the image shown below.
Step 6
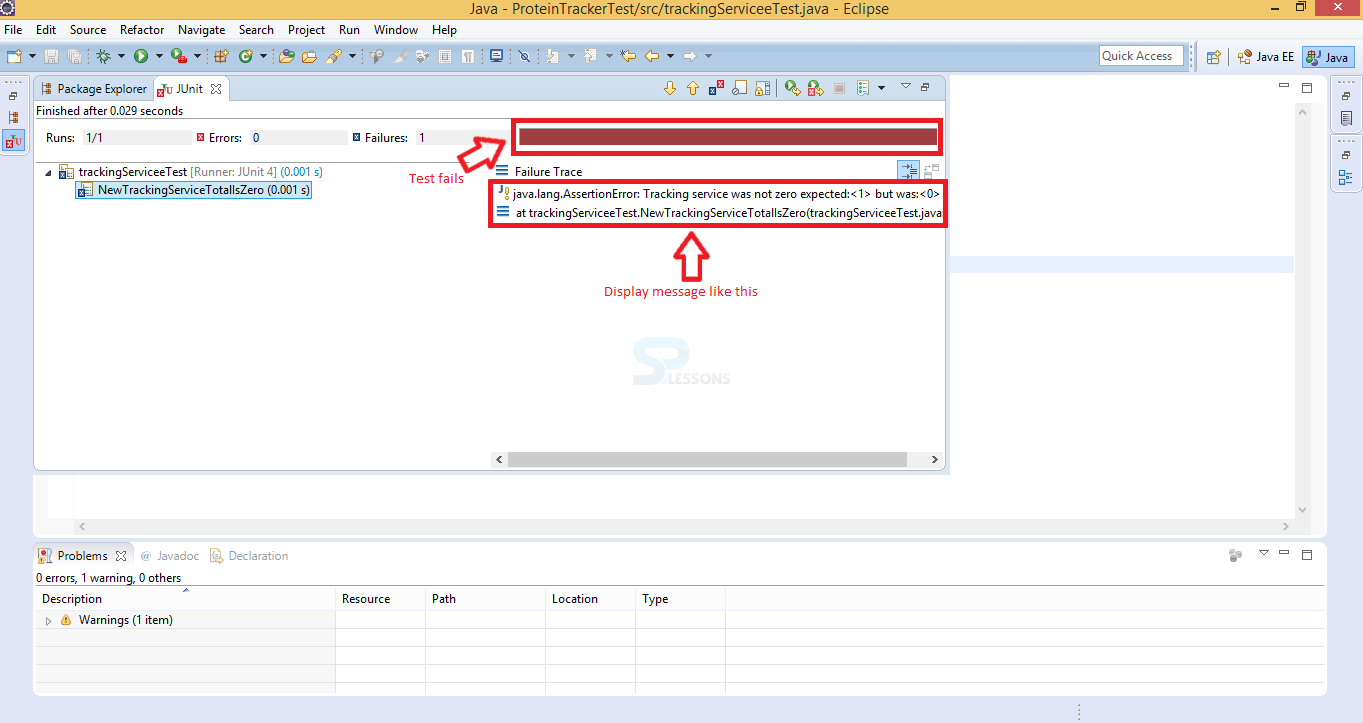
If the Tracking Service was not set to 0 ,if it is set to 1 or 2 it will give a alert message like java.lang.AssertinError with red color as shown in the image below.
Description
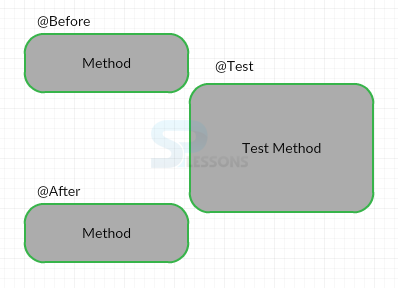
@Before and @After annotations are very useful in eliminating the unit tests. If the unit test contain duplication, they become very hard to maintain and they also more difficult to understand. By using these annotations user can solve such problems resolved. Below image demonstrate @Before and @After annotations.
@Before
If the user create a method that is public and void returns and annotated with the @Before that method will be called before each test in the test class run. This method is used set up the data before running the each new test.
Step 1
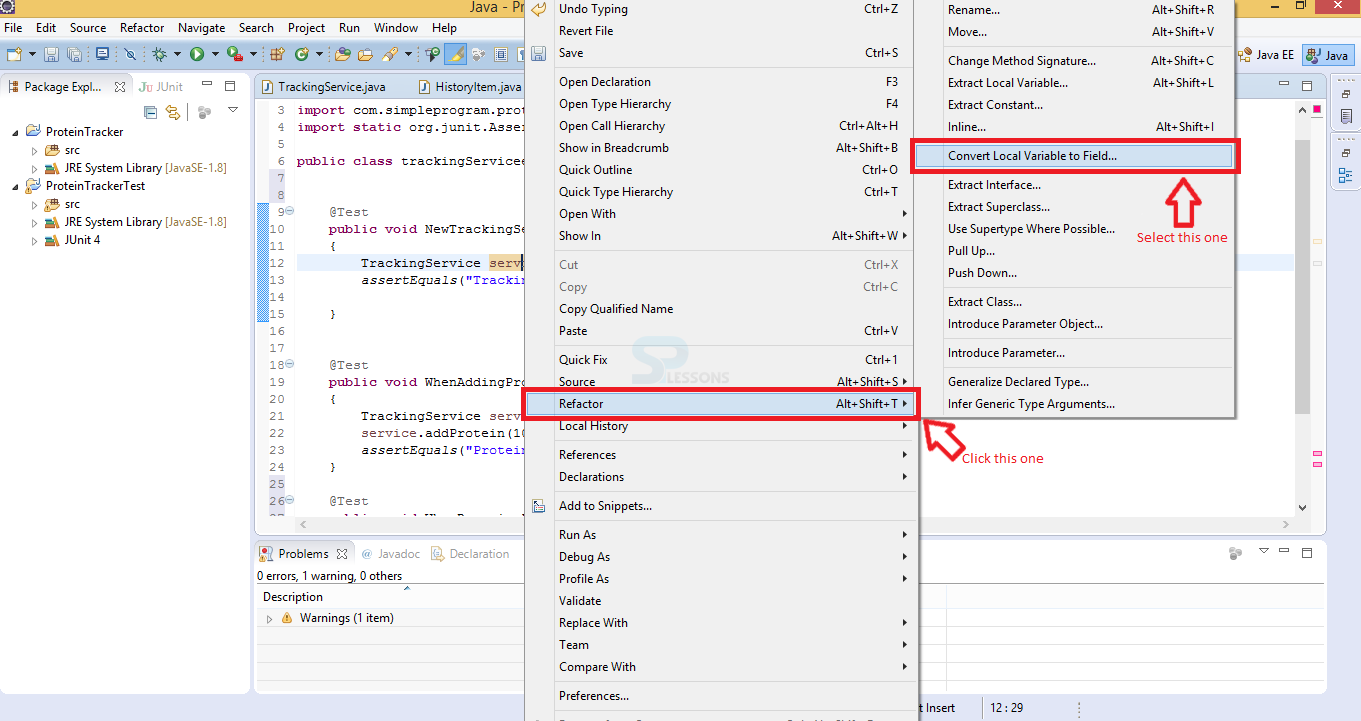
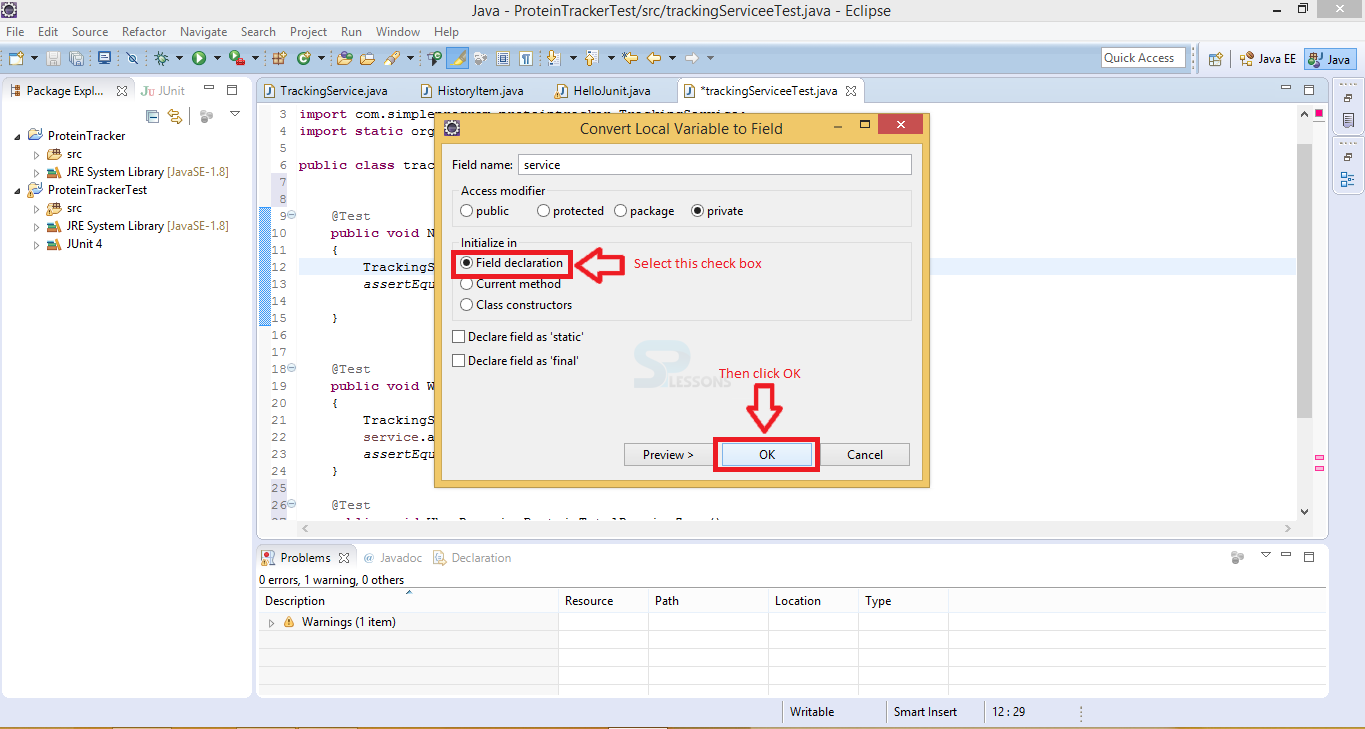
In order to do this test user need to convert the Service local variable to field Variable. First right click on the service variable and go with the procedure shown in the below image.
Select Refactor -> Convert Local Variable to Field variable.
Step 2
Then another window will appear named as Convert Local Variable to Field in that select the proper Field declaration like as shown in the below image.
Step 3
The below code demonstrate working of @Before annotation.
[c]
import org.junit.Before;
import org.junit.Test;
import com.simpleprogram.proteintracker.TrackingService;
import static org.junit.Assert.*;
public class trackingServiceeTest {
private TrackingService service;
@Before
public void setUp()
{
System.out.println("Before");
service = new TrackingService();
}
@Test
public void NewTrackingServiceTotalIsZero()
{
assertEquals("Tracking service was not zero", 0, service.getTotal());
}
@Test
public void WhenAddingProteinTotalIncresesByThatAmount()
{
service.addProtein(10);
assertEquals("Protein amount was not correct", 10, service.getTotal());
}
@Test
public void WhenRemovingProteinTotalRemainsZero()
{
service.removeProtein(5);
assertEquals(0, service.getTotal());
}
}
[/c]
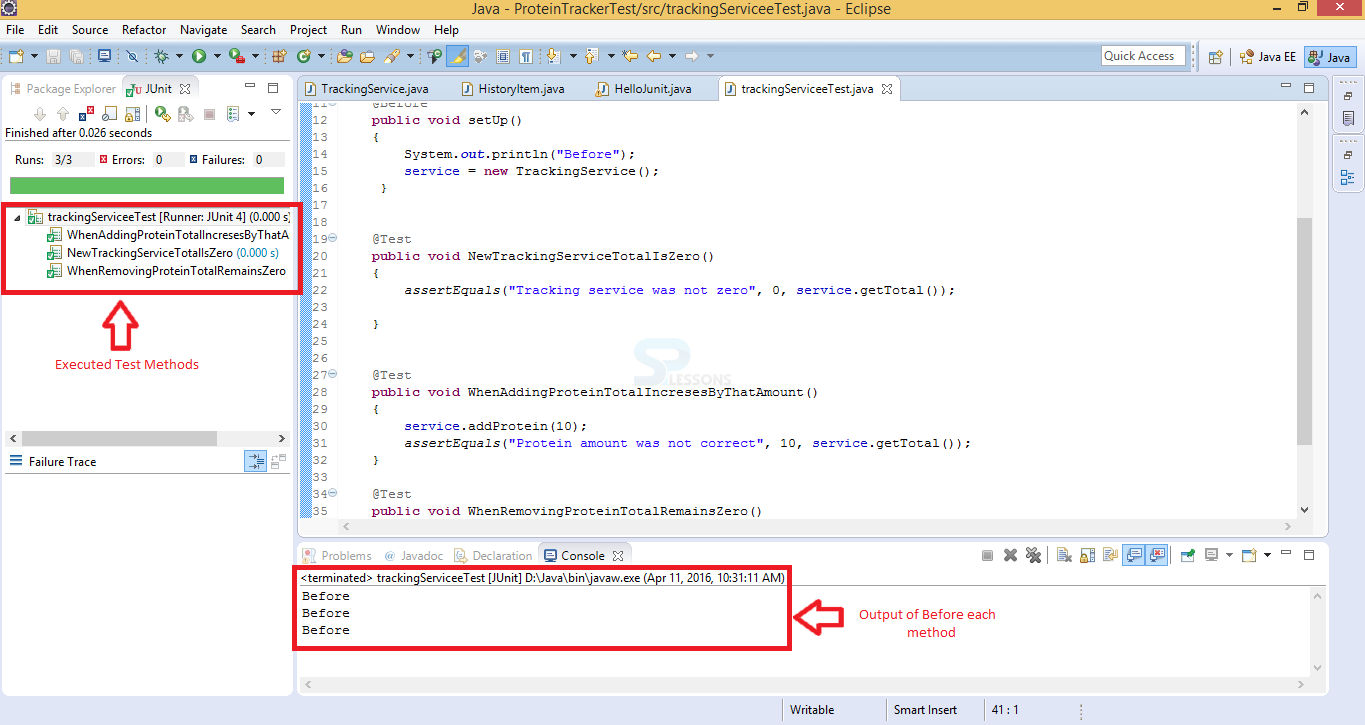
Step 4
By the run the above code given in step 3 will produce the following output as shown in the below image.
@After
This annotation works like @Before annotation expect that it runs after each test. This means annotating a public and void returns and annotating after the class. @After method can run even though @Before method have any exceptions.
Step 1
The below code demonstrate @After annotation
[c]import org.junit.Before;
import org.junit.BeforeClass;
import org.junit.Test;
import org.junit.After;
import org.junit.AfterClass;
import com.simpleprogram.proteintracker.TrackingService;
import static org.junit.Assert.*;
public class trackingServiceeTest {
private TrackingService service;
@BeforeClass
public static void before()
{
System.out.println("Before Class");
}
@AfterClass
public static void after()
{
System.out.println("After Class");
}
@Before
public void setUp()
{
System.out.println("Before");
service = new TrackingService();
}
@After
public void tearDown()
{
System.out.println("After");
}
@Test
public void NewTrackingServiceTotalIsZero()
{
assertEquals("Tracking service was not zero", 0, service.getTotal());
}
@Test
public void WhenAddingProteinTotalIncresesByThatAmount()
{
service.addProtein(10);
assertEquals("Protein amount was not correct", 10, service.getTotal());
}
@Test
public void WhenRemovingProteinTotalRemainsZero()
{
service.removeProtein(5);
assertEquals(0, service.getTotal());
}
}
[/c]
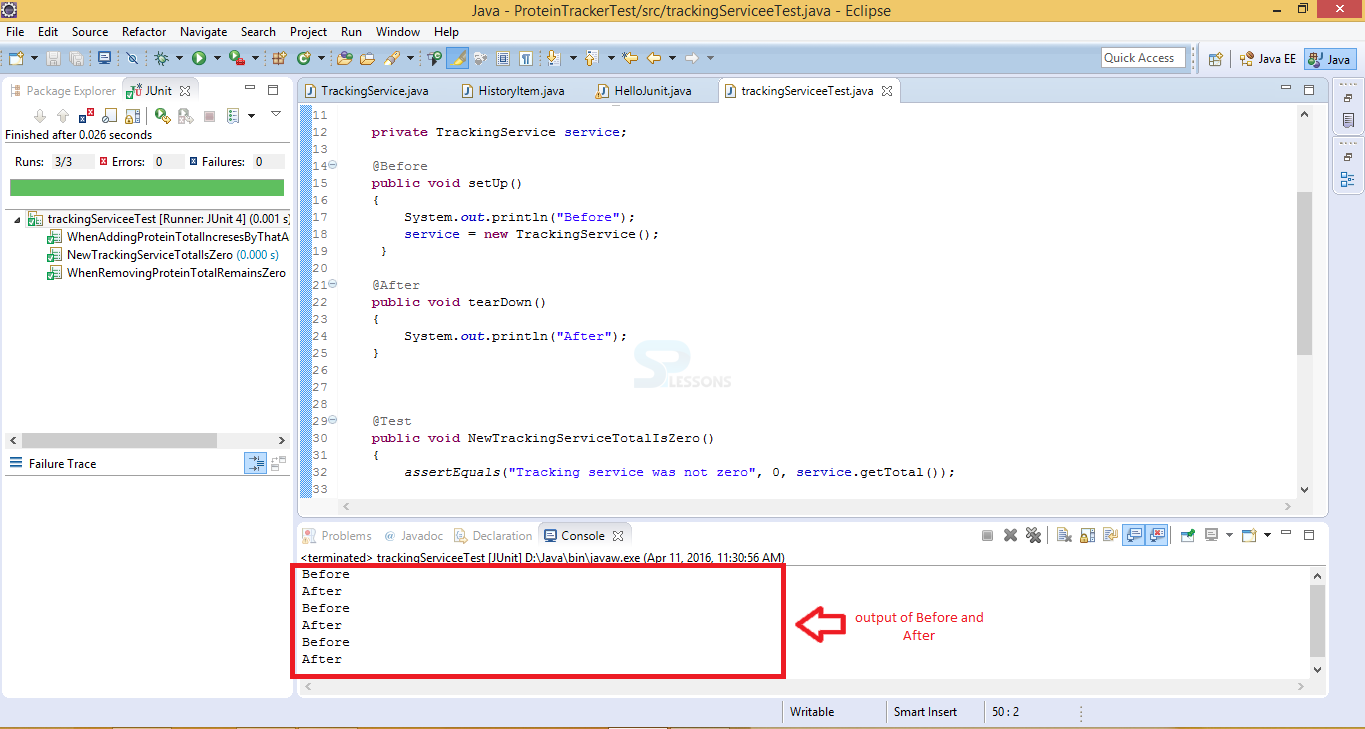
Step 2
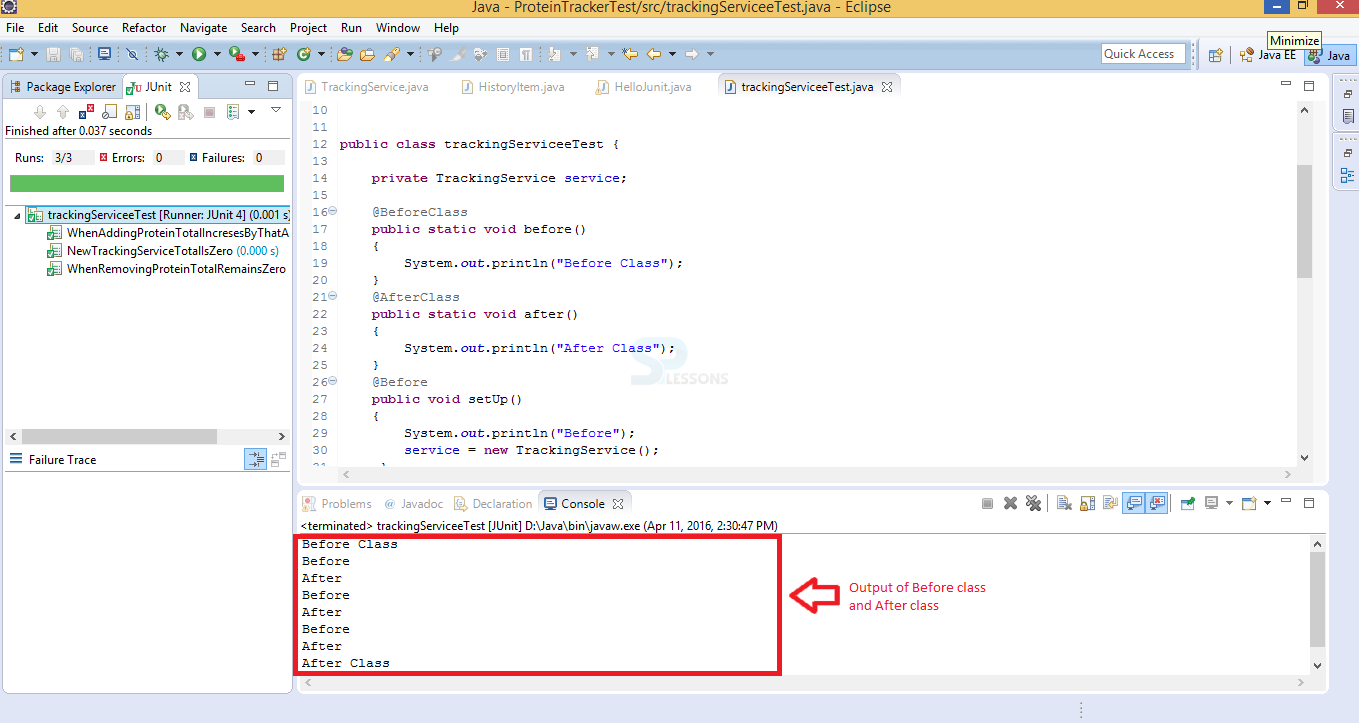
By the above code run successfully then the output will be every Before process After will execute like below image shown below.
Description
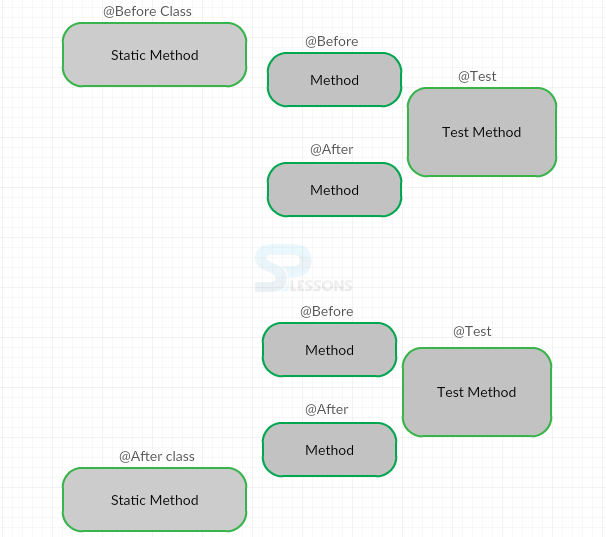
Before class annotating with public static void method. It causes to be run once before any of the test method in a class. Before class and Before annotations have the same functionalities difference is Before class is a class based and the Before annotation is a test based. After class annotating with public static void method. It causes to be run once After any of the test method in a class. @After class can run even though @Before class have any exceptions.
Step 1
The below code demonstrate @Before Class and @After Class works.
[c]import org.junit.Before;
import org.junit.BeforeClass;
import org.junit.Test;
import org.junit.After;
import org.junit.AfterClass;
import com.simpleprogram.proteintracker.TrackingService;
import static org.junit.Assert.*;
public class trackingServiceeTest {
private TrackingService service;
@BeforeClass
public static void before()
{
System.out.println("Before Class");
}
@AfterClass
public static void after()
{
System.out.println("After Class");
}
@Before
public void setUp()
{
System.out.println("Before");
service = new TrackingService();
}
@After
public void tearDown()
{
System.out.println("After");
}
@Test
public void NewTrackingServiceTotalIsZero()
{
assertEquals("Tracking service was not zero", 0, service.getTotal());
}
@Test
public void WhenAddingProteinTotalIncresesByThatAmount()
{
service.addProtein(10);
assertEquals("Protein amount was not correct", 10, service.getTotal());
}
@Test
public void WhenRemovingProteinTotalRemainsZero()
{
service.removeProtein(5);
assertEquals(0, service.getTotal());
}
}
[/c]
Step 2
In the above program Run as JUnit it will show the Before Class before the test method and after class after the all test methods will be executed.
Description
If the user need to ignore the some tests or group of tests then that test is annotated with the @Ignore those tests will not be executed temporarily. This annotation is also applicable for classes also.
Step 1
If User need to ignore the test method or class simply put @Ignore to that method then that test will be ignored, below program demonstrate @Ignore annotation.
[c]import org.junit.Before;
import org.junit.BeforeClass;
import org.junit.Ignore;
import org.junit.Test;
import org.junit.After;
import org.junit.AfterClass;
import com.simpleprogram.proteintracker.TrackingService;
import static org.junit.Assert.*;
public class trackingServiceeTest {
private TrackingService service;
@BeforeClass
public static void before()
{
System.out.println("Before Class");
}
@AfterClass
public static void after()
{
System.out.println("After Class");
}
@Before
public void setUp()
{
System.out.println("Before");
service = new TrackingService();
}
@After
public void tearDown()
{
System.out.println("After");
}
@Test
public void NewTrackingServiceTotalIsZero()
{
assertEquals("Tracking service was not zero", 0, service.getTotal());
}
@Test
@Ignore
public void WhenAddingProteinTotalIncresesByThatAmount()
{
service.addProtein(10);
assertEquals("Protein amount was not correct", 10, service.getTotal());
}
@Test
public void WhenRemovingProteinTotalRemainsZero()
{
service.removeProtein(5);
assertEquals(0, service.getTotal());
}
}
[/c]
Step 2
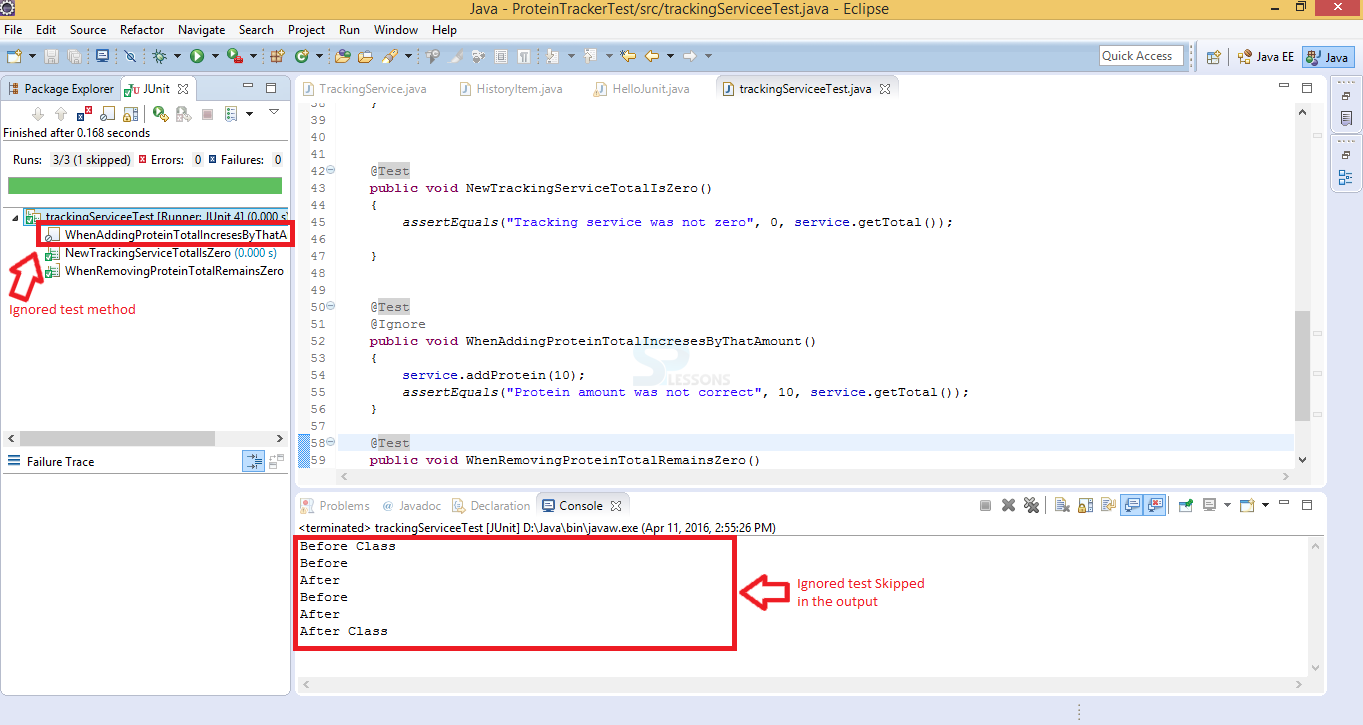
If this program runs successfully the ignored part should be shown in the below output image.
Description
Some times Expected behavior of a class throw particular kind of exception JUnit has a tool to check the exception was thrown and that it was right kind of exception by using test annotation Expected field. if we set the expected field is equal to an exception class, the test will only pass if an exception of that type is thrown.
Step 1
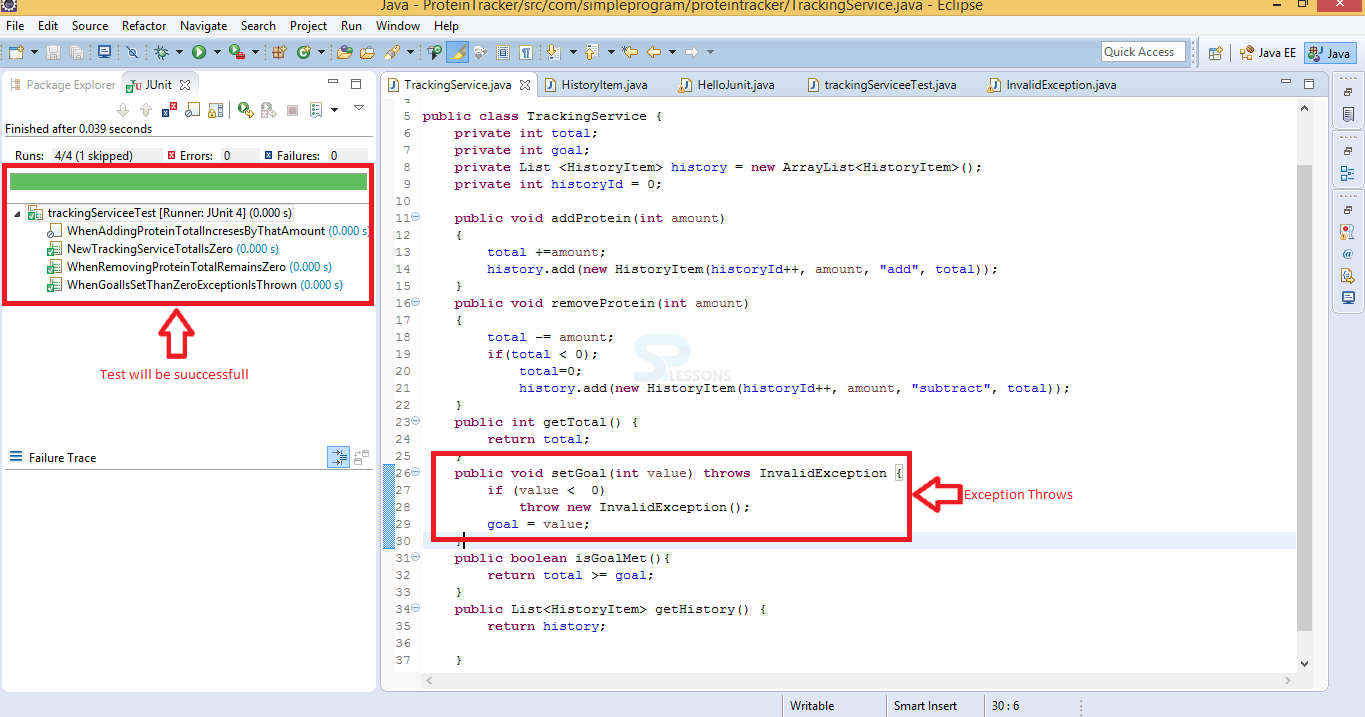
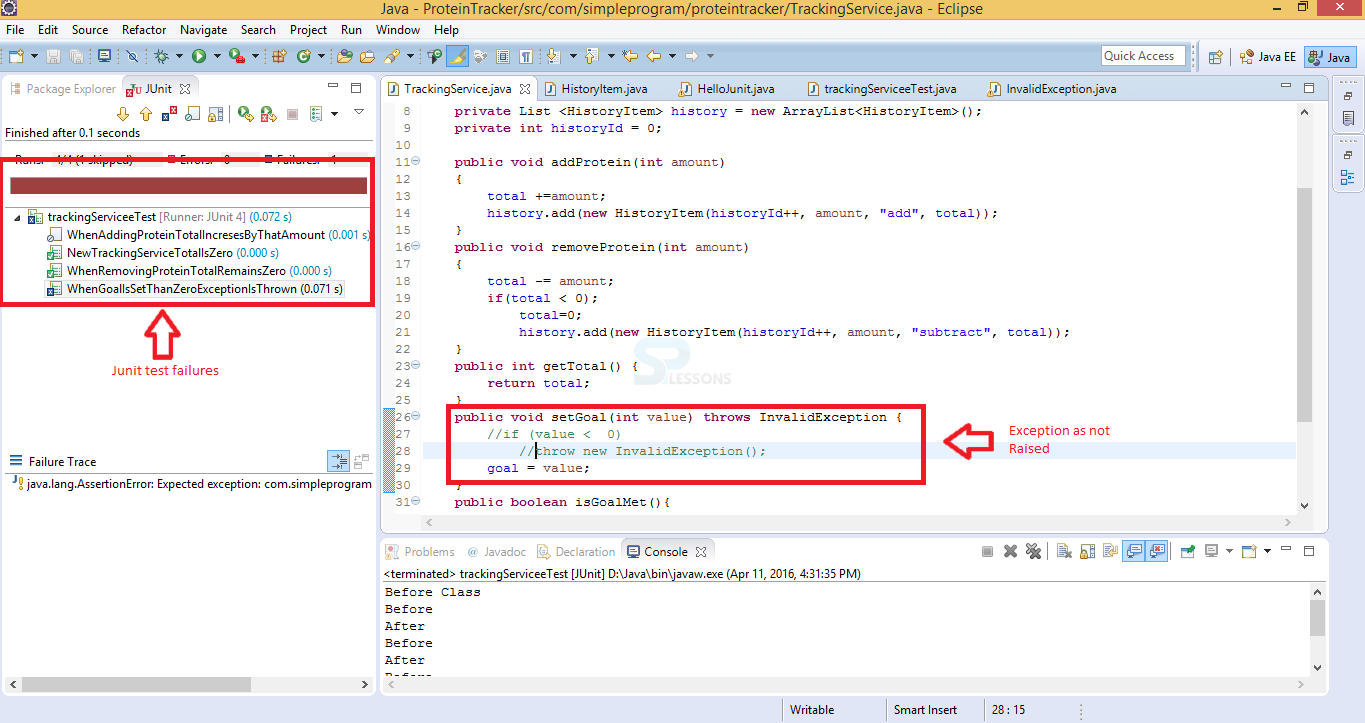
In order do the Except test initially user need to create a exception class and create the Exception method and then run as JUnit test then it would be run successfully because user created Exception class without this it will be raised error message in red color.
Step 2
Initially user need to create an exception class then only JUnit test get the positive results the process is shown in below image.
Step 3
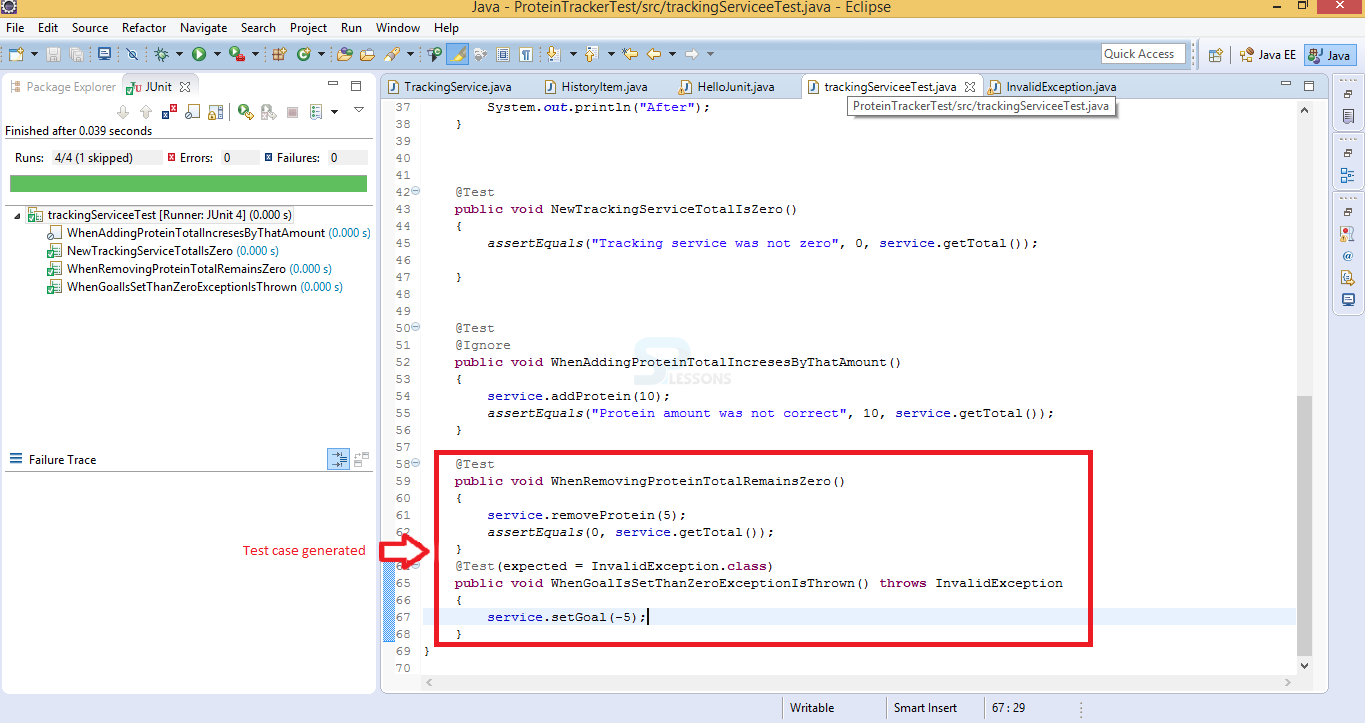
User need create the test method for the above created class that should be shown in the below image.
Step 4
If test class was not created then it shows JUnit test case error message in red color box like below shown image.
Description
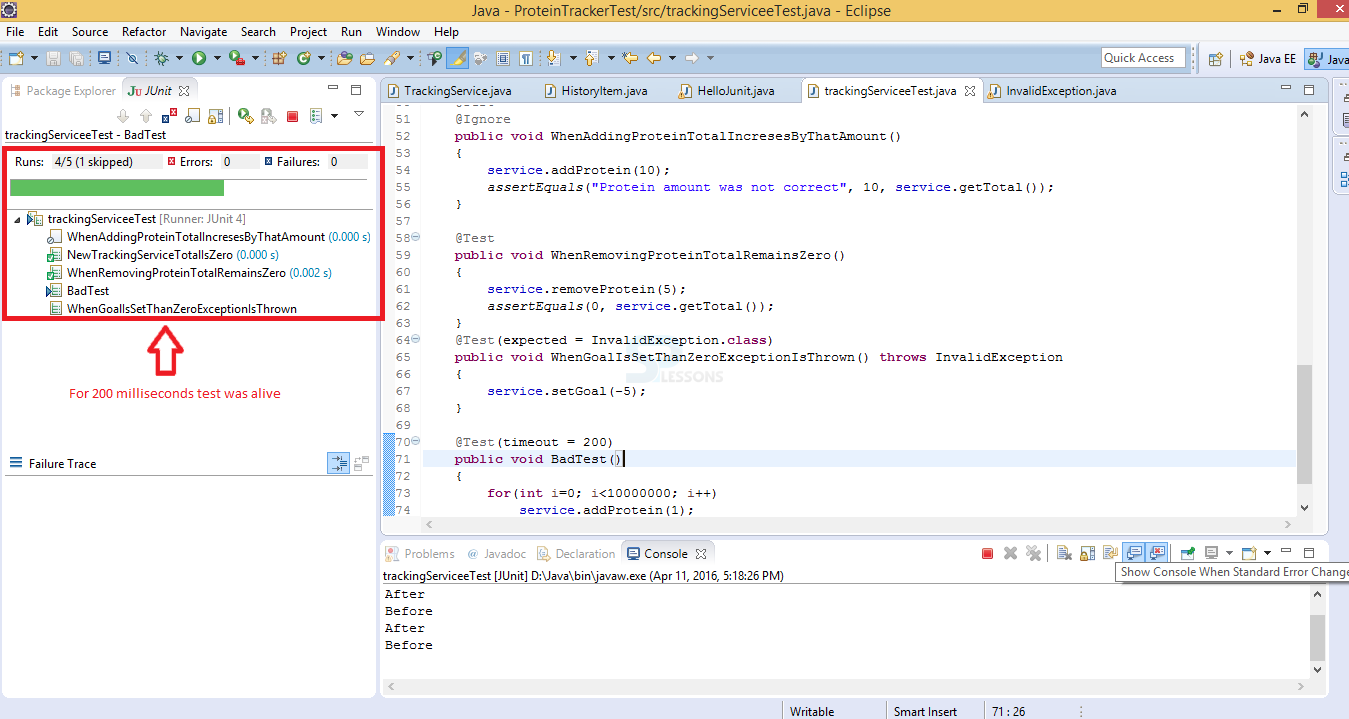
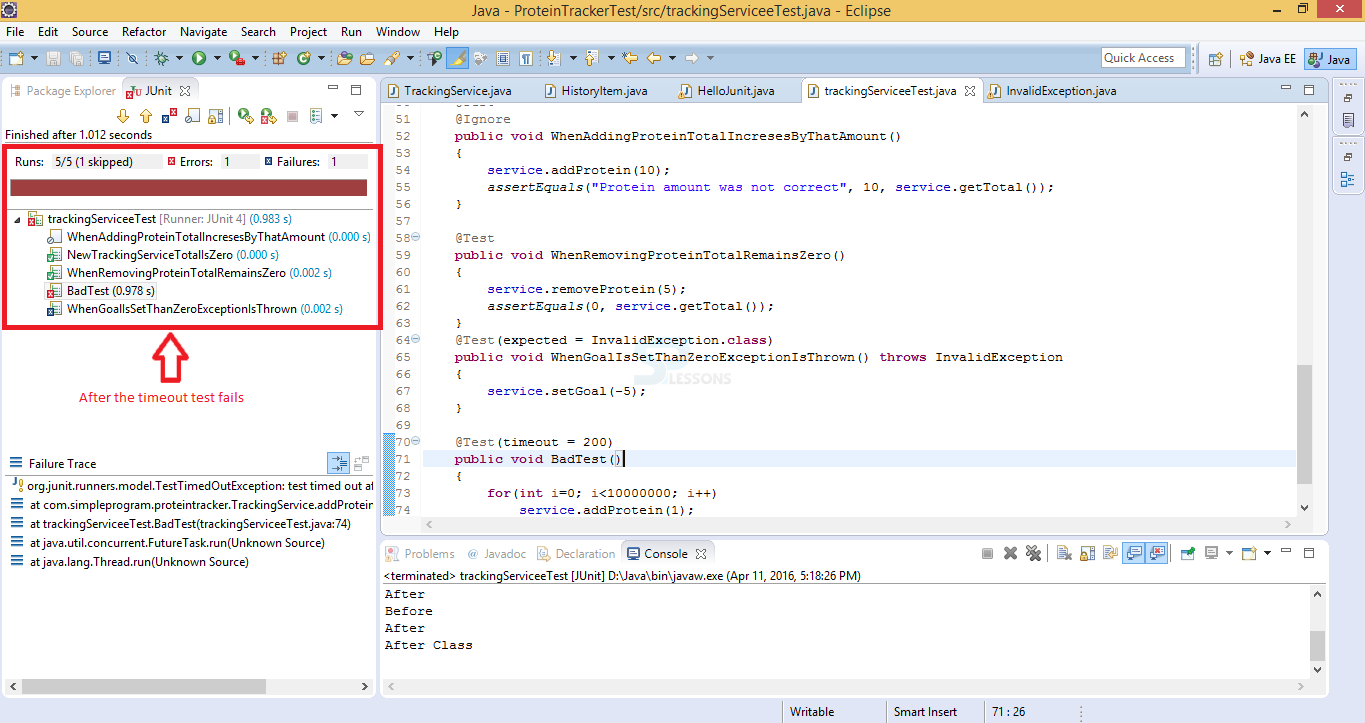
Some times user need to measure the test performance in terms of a time. for this JUnit has a parameter named has “time out”. If test take longer time to instead of given time then automatically test will be failed.
Step 1
In the time out test method programmer will give time to the test method. Whatever the time given by the programmer up to that time only test will be alive later it should be failed as shown in the image below.
Step 2
If the program will be timed out it should moved to the test failed state that should be shown below image.
Key Points
- JUnit Annotations - Run every Junit test program Run As in Junit Test only.
- There are multiple Before and After methods in a @Before Class and @After Class.
- Handling of Expected Exceptions are mandatory.
- Test Time out will play major role in some cases. It is mandatory to use in those Projects.
- If @Ignore method is used JUnit runner simply ignored the test method.