


 Introduction
In this article, one can learn about.
- GitHub Merging and Rebasing.
- Example for Merging.
- Example for Rebasing.
- Dangerous Rebasing.
- Social Coding with GitHub.
Description
Git merging and rebasing both of this are designed to integrate changes from one branch into another branch in different ways. Some people recommend not to use rebasing as it is dangerous to use. But, many developers recommend using rebasing as often as possible. The below examples show the difference between the both merging and rebasing.
Description
As software projects scale from small to large projects and with number of developers involved in this large projects so it need to be distributed among the developers, where every developer work on their own code and is should be combined with the other developers code and it’s called merging. The below steps shows the conceptual over view of merging in GitHub for windows.
Step 1
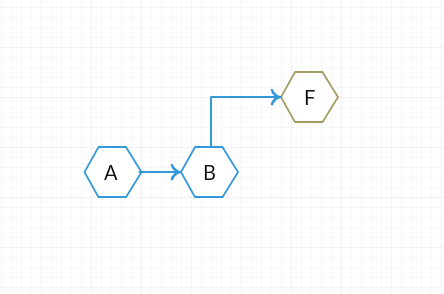
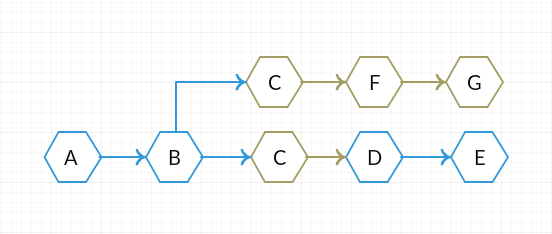
Initially a version control history tree consist of two commits. Assume them as commit “A” And commit “B”, which represents that commit A happened before commit B. Assume when a developer makes a new commit of his own. Represent this commit on different path saying commit “F” as show in the below figure.
Conceptual
figure
Step 2
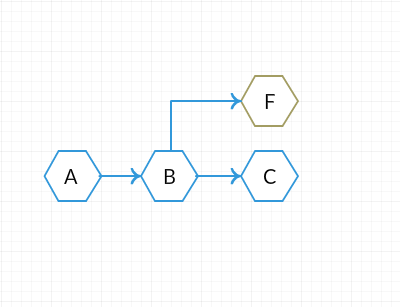
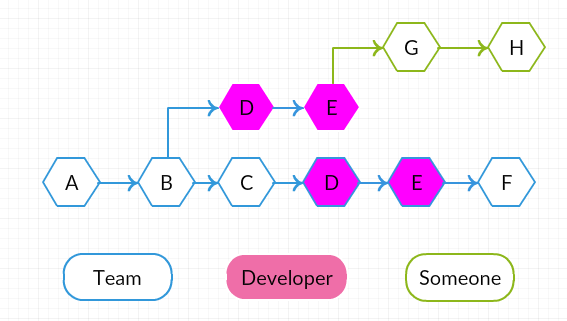
In git each developer is working on their own local work space and have local repositories, while a developer working on his own stuff, other people commit and push their commits into the centralized location. Assume it to be commit “C” as shown in the below fig.
Conceptual
figure
Step 3
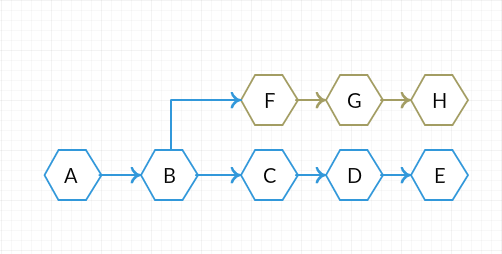
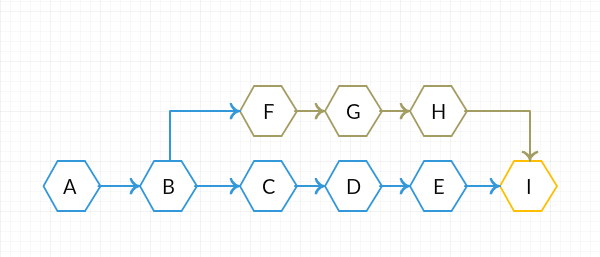
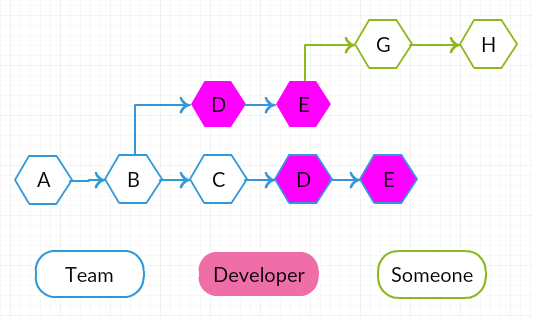
The developer and the members of the team continue working on their own repositories and occasionally commit some changes. And no need to worry about the changes made by the other people. But need to merge the code back into the centralized location. Assume the changeset made by other people be “F, G and H”, where commit “D and E” are the changes made by developer. As shown in the below fig.
Conceptual
figure
Step 4
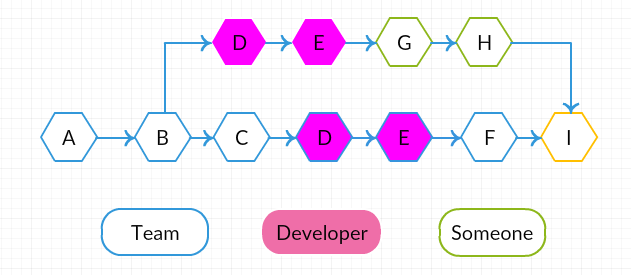
The developer need to merge the changesets made by other people with his code which is already present on the main repository to do this a new commit should be made by the developer on the main tree called merge commit which is represented with the letter “I” in the fig below.
Conceptual
figure
Description
The same example of merging can be considered for the rebasing, only a slight change to be done in rebasing. The steps from 1 to 3 in merging example are similar even in rebasing. But the only change done was in step 4.
In merging, developer merge the code with the other people changesets by adding a merge ‘commit I’ as a new commit on the main branch.
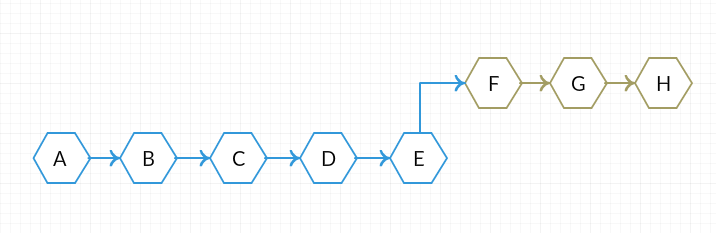
But in rebase, instead of merging the changes and represented by new commit and rewrite the history. So, instead of “F” depending on “B” as it’s starting points. Let’s pretend that started working on “F” until “E”, the last commit on that history was already committed as a result the rebase is going to end up looking like in the fig below.
Conceptual
figure
Description
Rebasing is a little bit more complicated than a merge and less used, since merging exist in old centralized version control systems and rebasing became common only in distributed version control system. The below example more complicated when compare to the above example of rebasing.
Step 1
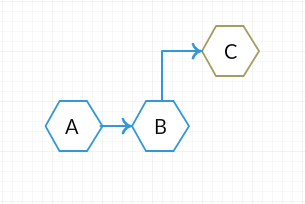
Assume the same commits that had before, A and B. When a developer make another commit C and done making changes to commit then pushes it for everyone else, since something that everyone needs to depend and work. The conceptual figs below show the commits made.
Conceptual
figure
Step 2
When developer is satisfied with the changes then pushes the commit on to the stack which is going to end up looking like the below fig.
Conceptual
figure
Step 3
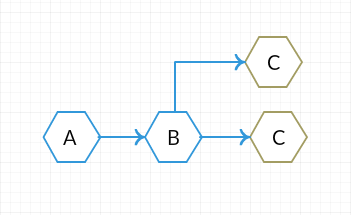
When one has access to that commit, then starts building a new code based on that. And end up with a few changes depending on commit C, where some changes done by other developers and some by the own team of the developer. The below fig show the changes committed.
Conceptual
figure
Step 4
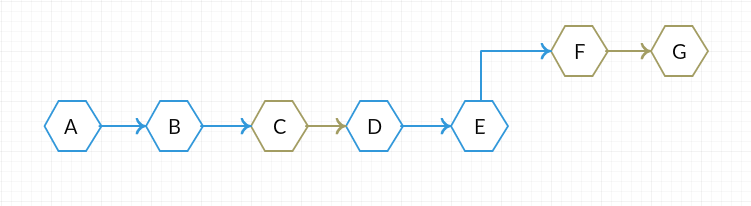
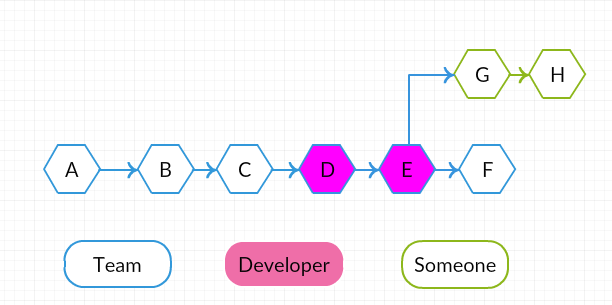
When the developer want the changes back in line with everyone, rebase and update the code instead of depending on B as its base point, changes the base as E. the commit F and G now depend on E. No need of taking commit C, because it rebased and checked before and the code C already exist on the line. Finally, going to end up looking like shown in the fig below.
Conceptual
figure
Description
Sometimes rebase can be dangerous. The below example illustrate some of the dangers and some good practice which help in avoid making a rebase dangerous.
Step 1
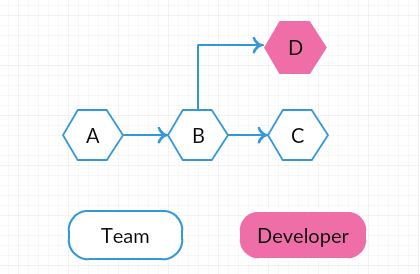
Assuming A and B as the initial commits. So, when a developer decide to make a branch and start building his new feature in the branch. At the same time the team continue committing onto the tree then to the main branch and push the changes. The below fig show the changes made by the developer and team.
Conceptual
figure
Step 2
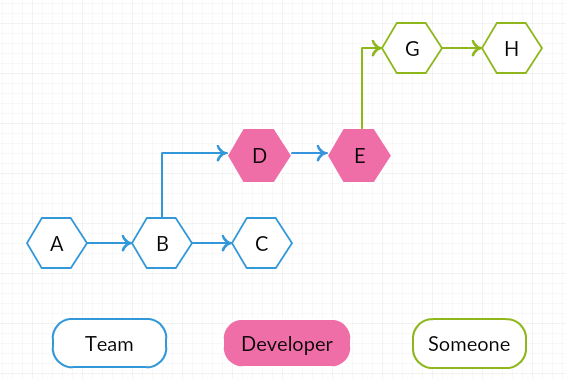
The developer can keep working on his feature, in order to access the feature from any computer, pushes the branch to the central repository and someone else start their work using this branch. The fig below represents the other people working locally using the branch from central repository. Where G and H represent the commits made by others.
Conceptual
figure
Step 3
Once the developer satisfied with the change and tested everything, rebase to the code and push it out to the main branch so that everyone can use the code. Which are represented by the D and E in the fig, now the commits D and E have the new id’s because they are based on a new base.
Conceptual
figure
Step 4
From step 3 one can notice that commit G and H depends on the old D and E and from now they depend on the absolute changes. The D and E they depend on are not going to be merged back in since that already rebased in a D and E change. And a commit F is made for the further changes as show in the below fig.
Conceptual
figure
Step 5
When the other developer knows about the rebase which made can either rebase onto the new branch or on the original branch. If the other developer don’t want to work on the new commit F may continue working on the same base E. As shown in the below image.
Conceptual
figure
Step 6
Let’s go back again before the other developer rebased and imagine the work done locally, without knowing were to use the code. Then developer decide to merge the code and end up with a new merge commit similar to the commit used in the merging example and as shown in the fig.
Conceptual
figure
Rule 1
Never rebase after pushing a branch.
Rule 2
Never rebase after commits use your branch.
Rule 3
Never rebase after pulling someone else’s branch.
Description
Stashing is a way to store some uncommitted changes temporarily so that one can do operations while they are stashed. The below step by step procedure explains where stashing can help.
Step 1
Create a local repository in a git hub. Go to settings and open the explorer.
Step 2
Create a new file with some name and open the file and type some text as shown in the below image.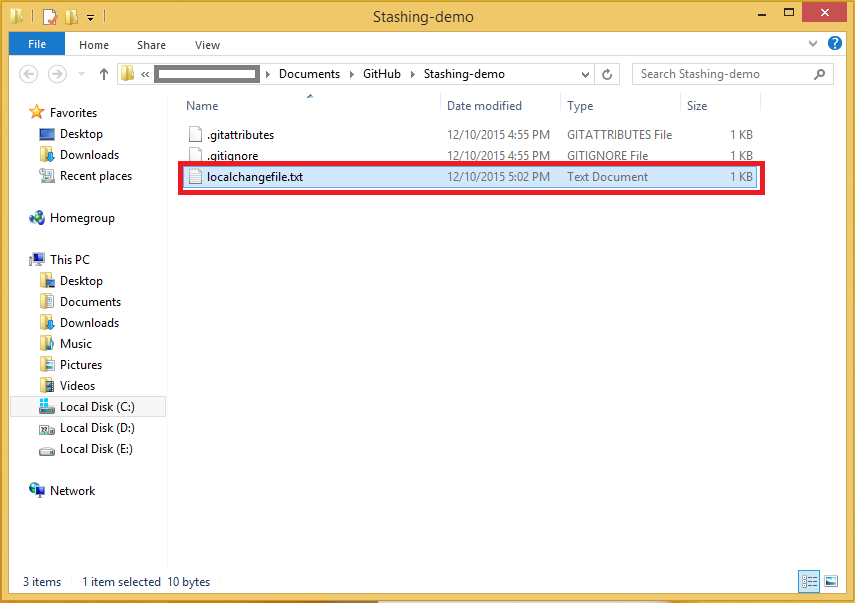
Step 3
Get back to github commit the changes made. Type the summary of the change in the option provided at the uncommitted changes window, and then click the button commit to master. As shown in the below image.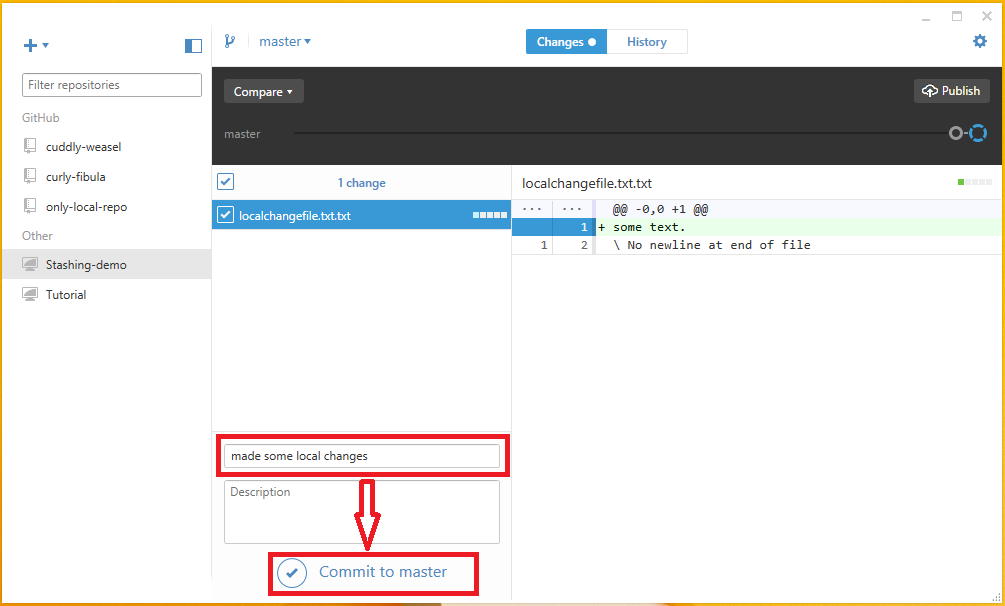
Step 4
Publish the repository so that the repository add to the central server add a README.md file at the server location and get back to the file location and make some other changes, like add some more text in the file. As shown in the below.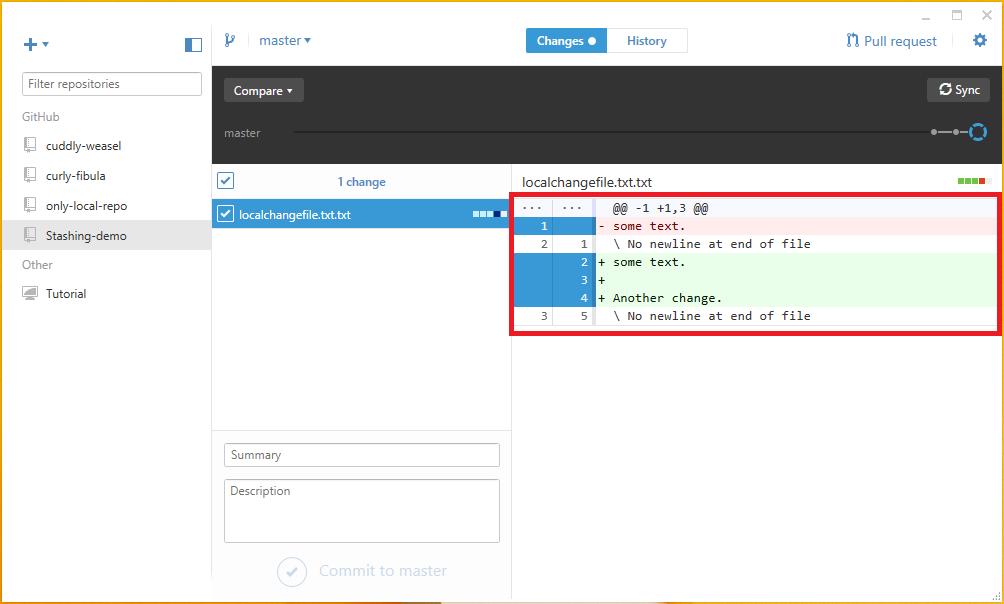
Step 5
In github for windows as you right click on the file in changes window it is provided only with discard changes and open in folder options but there is no way to stash the changes so in order to stash jump to command line in github. Type git stash command in the github shell as shown in the image below.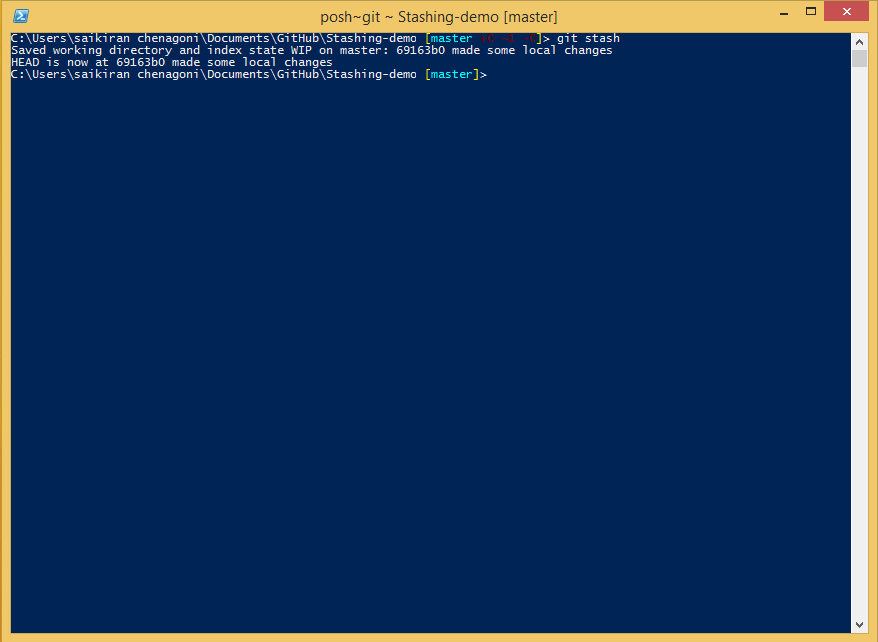 And now it stashed the local changes.
Step 6
Get back to the GitHub for windows and have no changes to be commit. And now it’s ready to sync. Click the sync button which is provided at the top left corner of the window which is shown in the below image.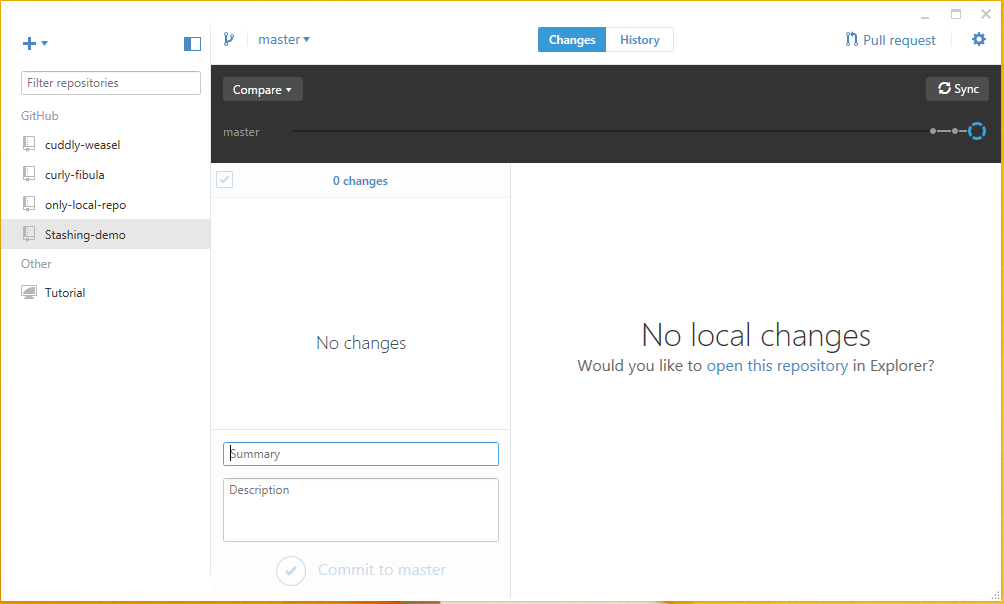
Step 7
To get the committed changes back go back to the gitshell. The operation used to get the changes back is called as pop. So, type git stash pop command in the gitshell as show in the fig below then the changes committed will get back to the GitHub. Close the command line and go to github.
Step 8
Get back to the GitHub where the committed changes are back again as shown in the fig below and this changes now can be committed directly and can be sync again this is how the stash work in GitHub.
Description
In GitHub when one want to contribute or use someone else’s project as the starting point of their project. This process is known as forking.
Creating a fork is nothing but generating a personal copy of someone else’s project. In a simple way, fork is a bridge between the original repository and one’s personal repository. The GitHub.com is hosted with a test repository called “Spoon-knife project”. Click the Fork button in the header of the spoon-knife repository.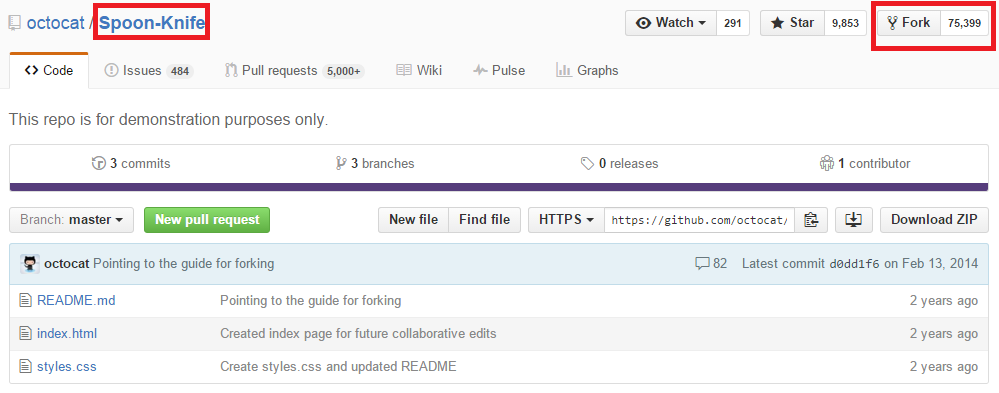 By clicking the fork a copy of the Spoon-knife repository is created.
Description
The forked Spoon-knife repository exist only on github to work on the project, and need to be clone in to the personal work place, which is done by clicking a button Clone in desktop.
The clone button is provided on the header of the Spoon-knife fork copy. Once clicking this button, a conformation window is generated asking whether to launch the desktop application to clone the repository. Store the fork copy files in the hard drive.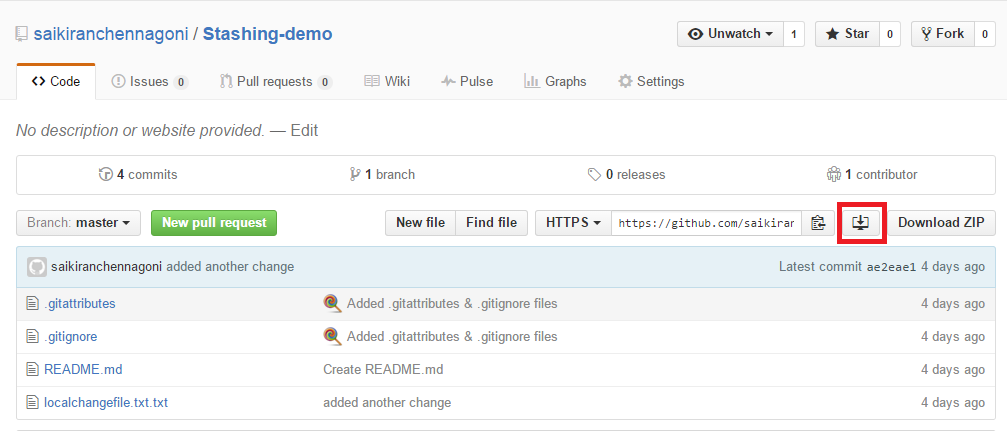
Description
Open index.html or README.md files in the drive and make a few changes like adding the GitHub user name. Get back to the GitHub window and type some text in the commit changes summary and click the button commit to master.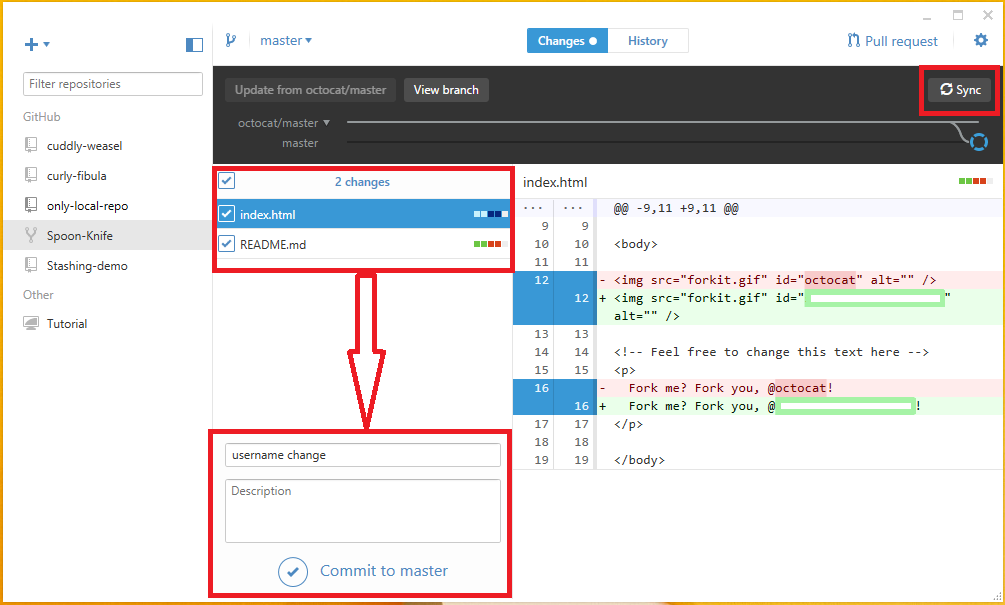 When the changes are ready to push up to GitHub.com, click on the Sync button, which is right above the list of changes.
Description
The most important and final step in producing a fork of someone else’s project was making a pull request. To do so, click on the compare button provided on the top left of the repository header.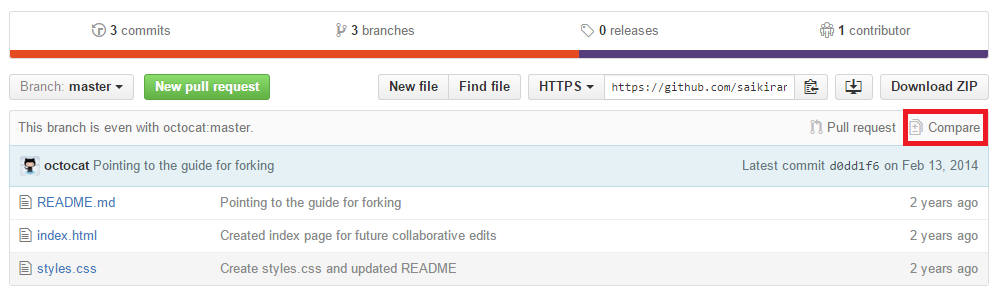 By clicking the compare button that’s going to bring a discussion page after performing all the discussions and reviews on the changes, click Create pull request button.
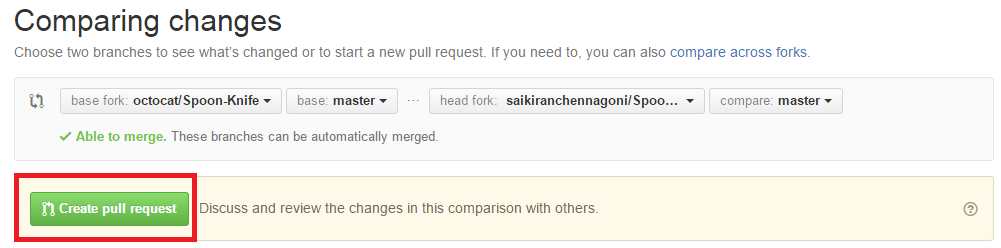 Pull request is an area for discussion, where the project owner may reject the pull request and ask for more information on why it has been made. The project owner may merge the pull request or may not. But, the copy will exist in infamy on the internet and can be used by others if valuable.
Description
In GitHub every repository has its own graphs, which display the data about contributors, commits for the repositories of the default branch. On the main page of the repository click the option Graphs and the following are the graphs provided for each repository in GitHub.
- Contributors
- Traffic
- Commits
- Code frequency
- Punch card
- Network
- Members
Contributors
The graph shows the top 100 contributors of the repositories life time and doesn’t include merge commits or the commits with zero changes. The image below shows the contributor main graph and also the specific graphs for each contributor of a repository in GitHub.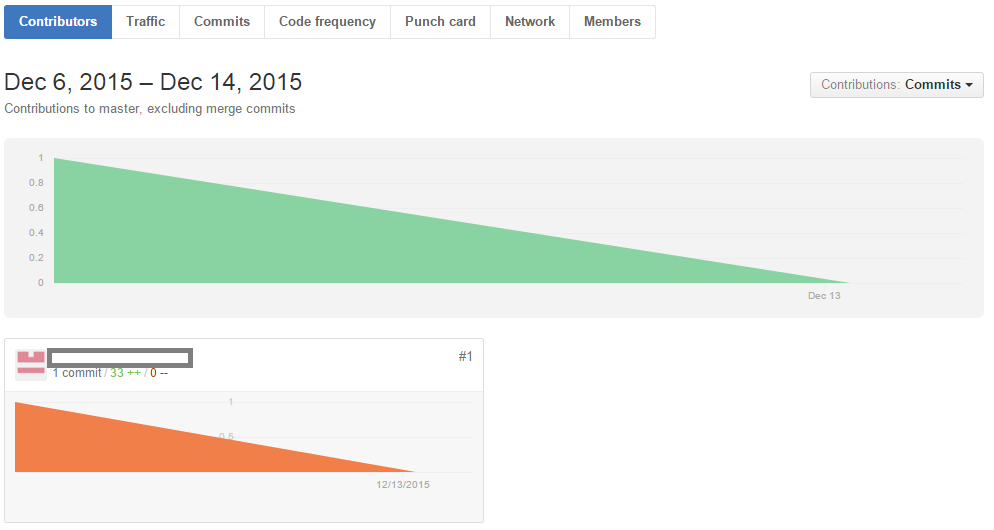
Traffic
The graph shows the git clone and web visitors of the repository for the past 14 days to the owners and administrators. And also shows the popular content and referring sites of the repository the below image shows the traffic graph of a repository in GitHub.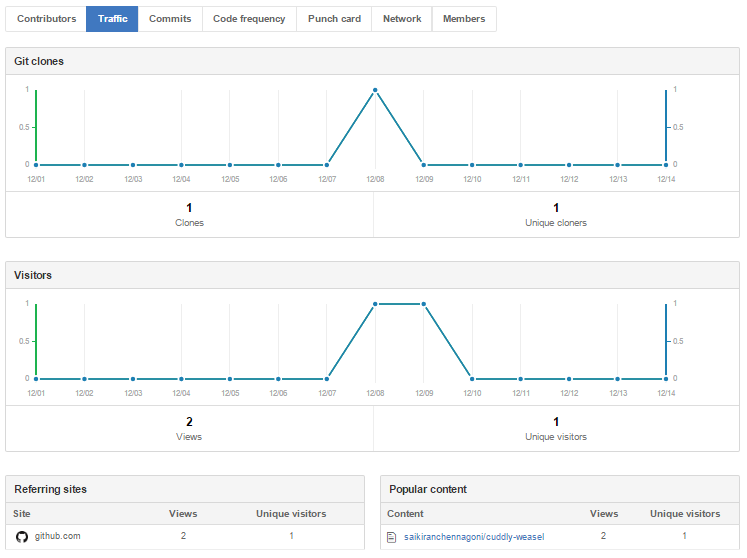 The graph uses the UTC + 0 TIME ZONE, despite of the location.
Referring sites
This section excludes the search engines, and specify path of the referral came from.
Popular content
This section shows the link to the parts of the content that is generated by traffic.
The graph uses the UTC + 0 TIME ZONE, despite of the location.
Referring sites
This section excludes the search engines, and specify path of the referral came from.
Popular content
This section shows the link to the parts of the content that is generated by traffic.
Commits
The graph shows the commits made to a repository. Since, from the past year or a week which exclude merge commits. The below image shows the commit graph of a repository in GitHub.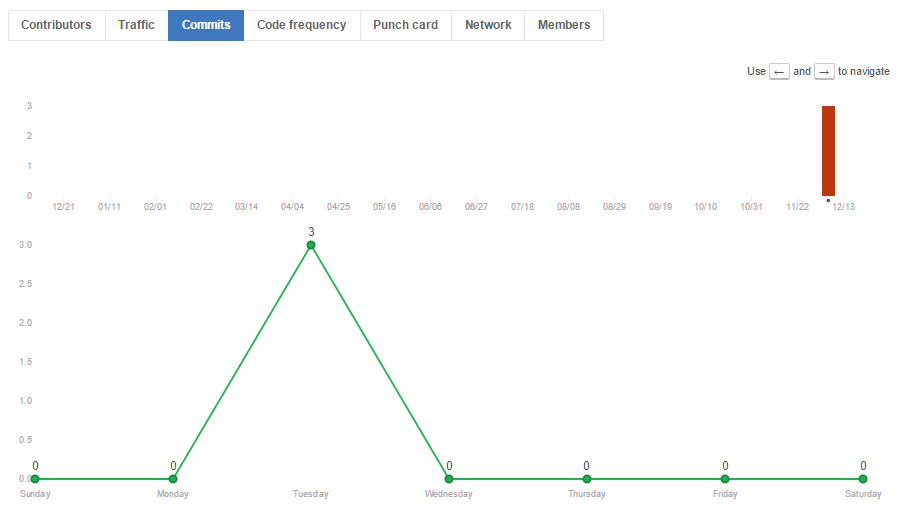
Code
The graph uses the same information used by the commit graph, to show the number of additions and deletions in the repository per week. The image below shows the code frequency graph.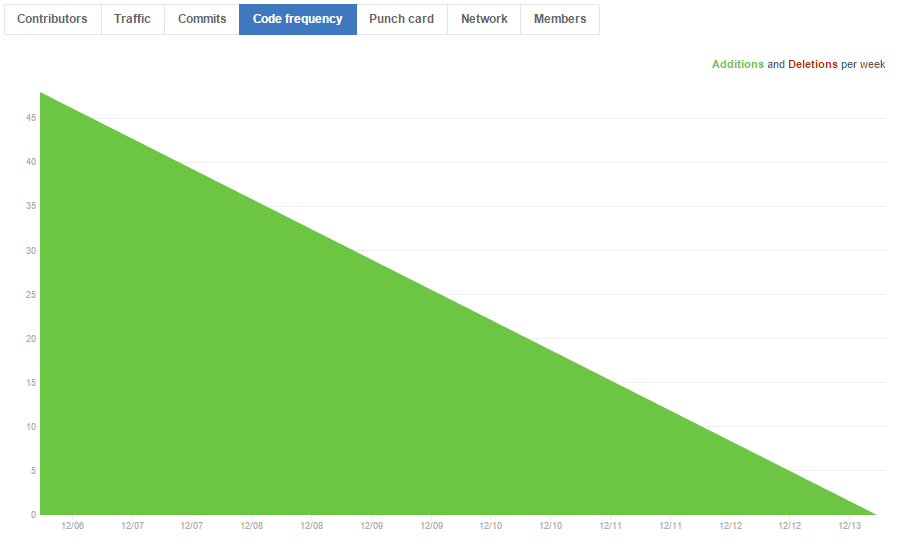
Punch card
The graph shows time to time changes and updates to the repository based on a day or a week and indicated by the dark black circles with variation in size, which exclude the merge commits. The image below shows the punch card graph of a repository in a GitHub.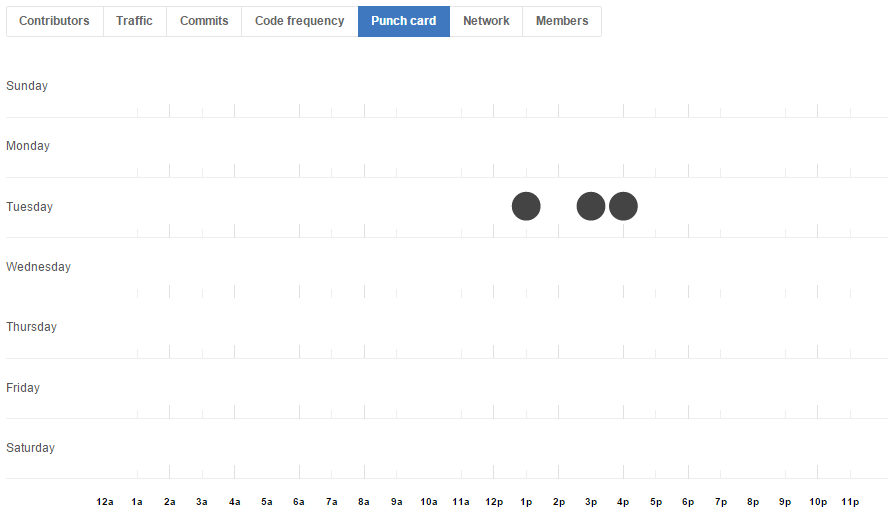
Network
The graph shows the entire history of the repository network such as branches of the repository, forks which contain commit to the network. The below image shows the network graph of a repository in GitHub.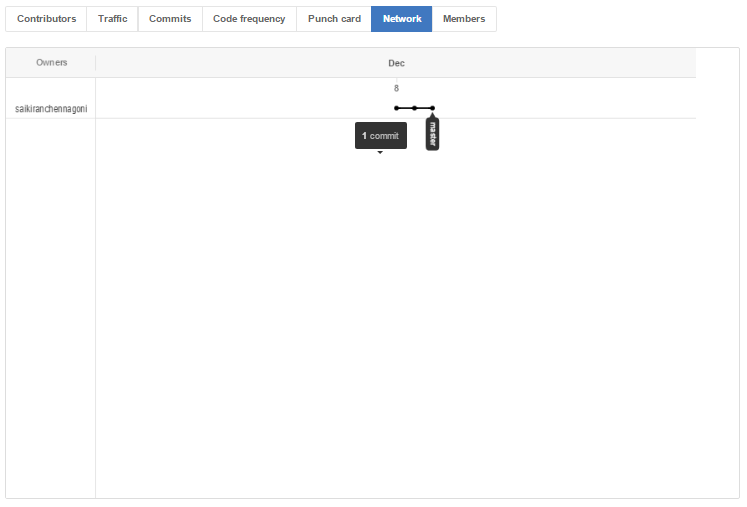
Members
This section shows all the forks made by the members to a repository.
Description
Gists are used to share the work in GitHub. Using Gists one can share a single file, parts of files or full applications. Every gist can be forked, cloned and manipulated same as a Git repository. There are two types of gists in github
Public gists
Public gists are searchable and one can use this gist for others to find and see their work and they show up in discover.
Secret gists
Secret gists are not searchable and one can use this gist for creating a to-do list or to prepare some code or to prose that which is not ready to share with the world.
This gists don’t show up in discover and don’t count as a private repositories, one can create as many secret gists as they like.Secret gists are only visible when one sends the URL to see it.
Additional to this two gists, there is another gists called Anonymous gists.
Anonymous
When one create a gists without logging into the GitHub, that’s going to be an Anonymous gists. This gists can be either public or secret.
Description
On the home page of GitHub it is provided with the option Gist. By clicking the option that’s going to direct to a page, where one can create a Gist. The below image shows the gist home page in github.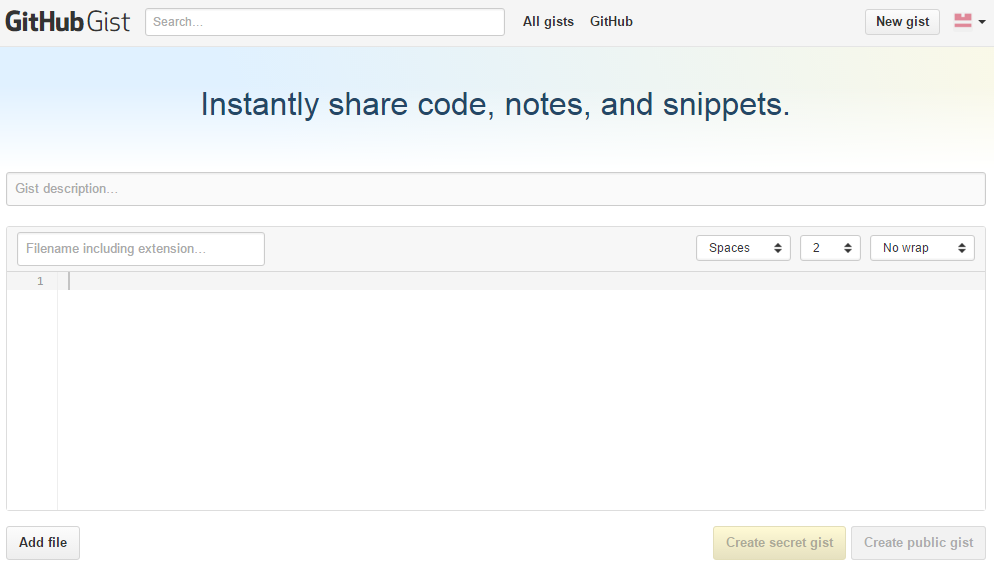 The gist home page is provided with options Gist description and text box. One can type the description and the text of their own gist and proceed to create a gist by making it either a secret gist or public gist by clicking the buttons provided at the bottom of the gist home page.
Description
some of the conflicts issues and other consistency problems that one can run into when working in a team can only avoided by using the .gitattributes file.
By using this files in the repository one can be able to get a little bit more control over how everyone else commits as well as how things get merged when pulling the changes.
.gitattributes file is a very powerful tool and one have a lot of advantage by using this files. The below steps show how to add a .gitattribute file to a repository.
Step 1
Create a new repository in github.com, clone it to the desktop and save the files in the hard drive to work locally. The below image shows the repository created and cloned into the github for desktop having two files .gitignore and README.md.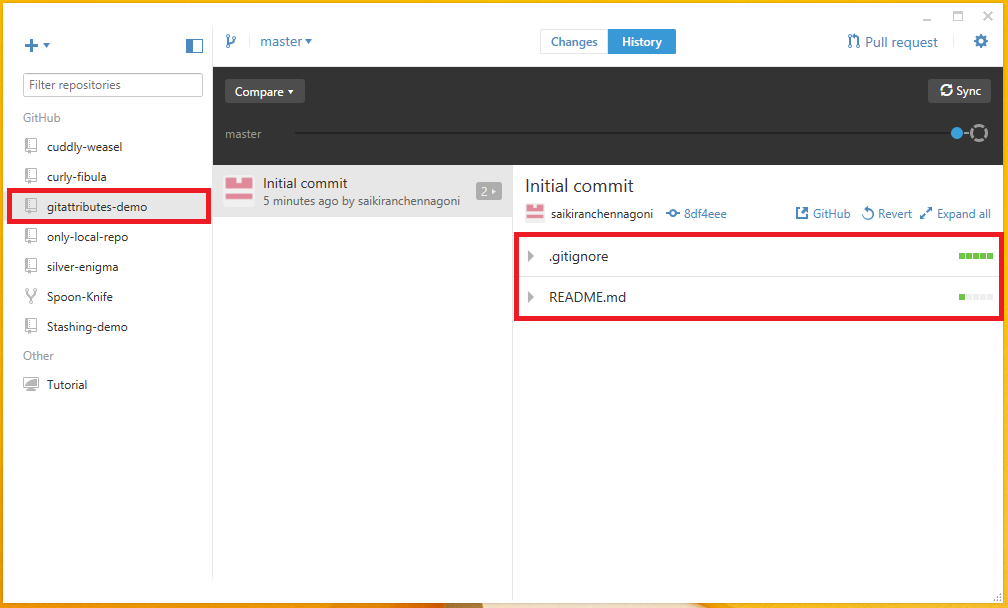
Step 2
Go to the Repository settings that’s going to bring a page providing some options like Remote, Ignore files, Attributes. Click the attribute and add the attribute file by clicking the option provided +Add the recommended .gitattributes file. The image below shows the attribute setting in github.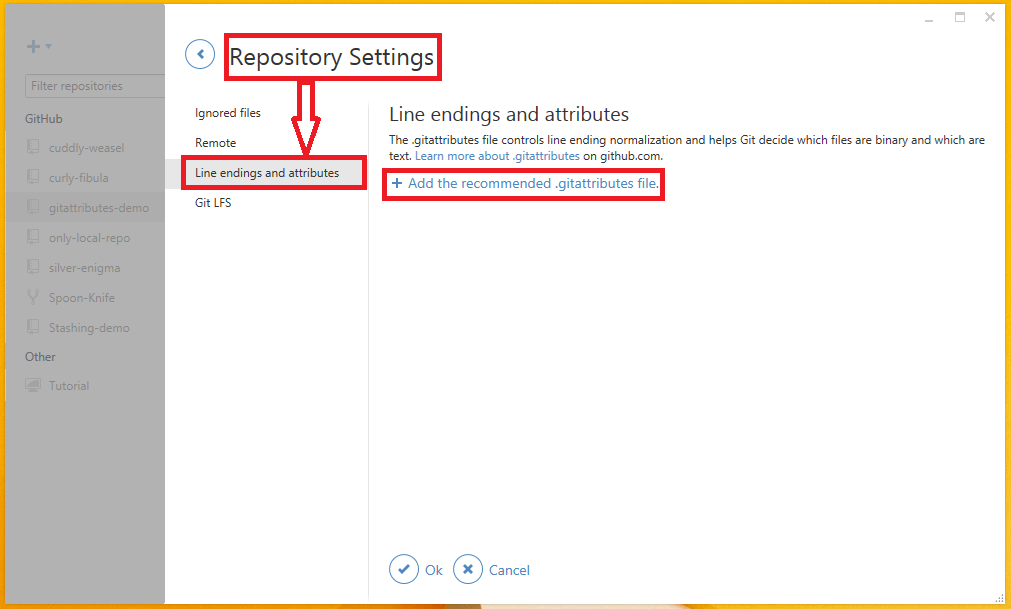
Step 3
By clicking the add gitattribute file it automatically create few lines for visual studio and also detect some text files. As shown in the image below.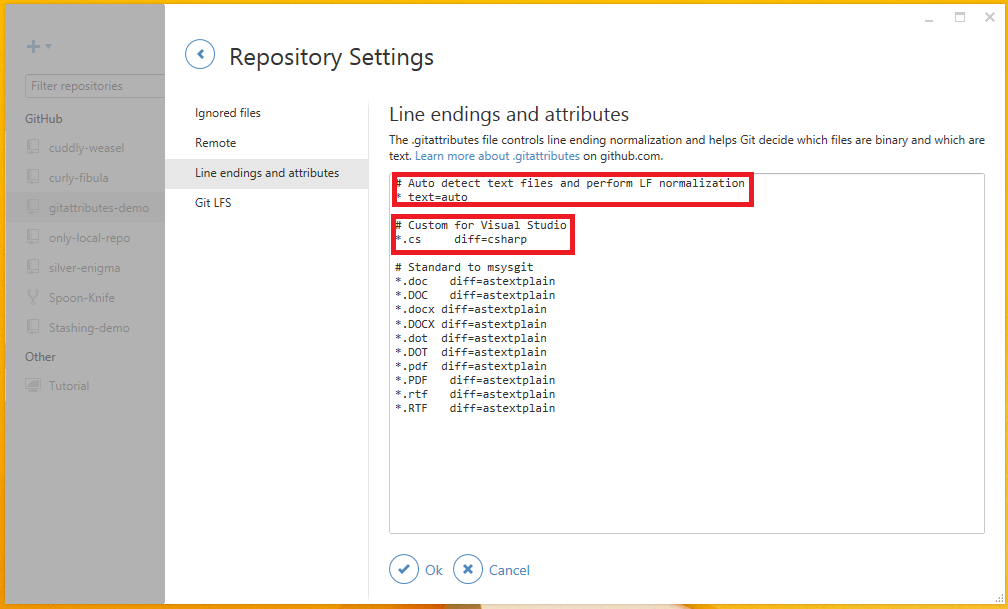
Step 4
Before clicking ok button to update, add an additional row below the auto detect text row. Add a .foo file to the row as shown in the below image. And click the button ok to update.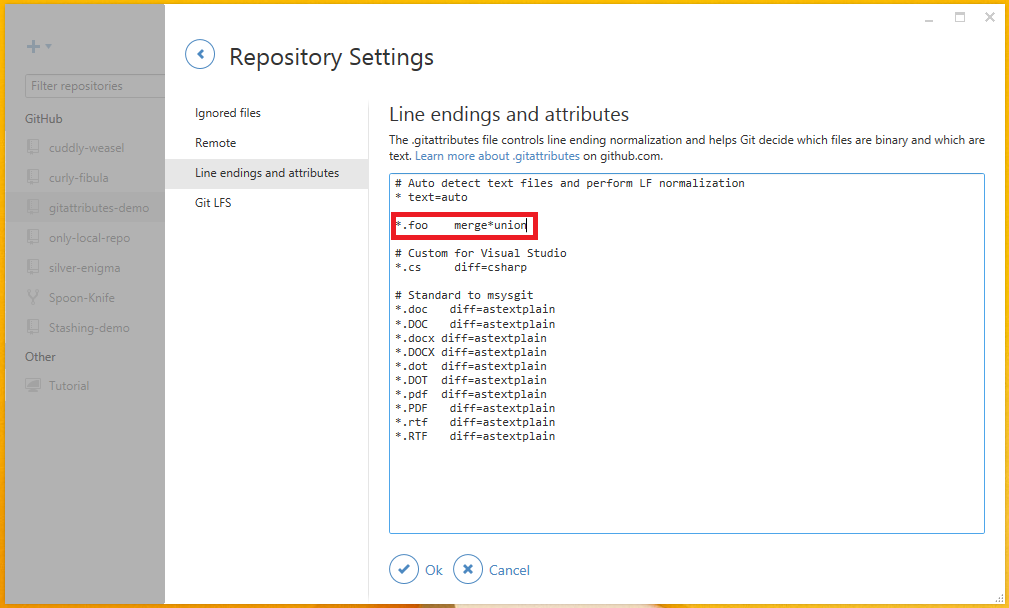
Step 5
Go to file location and create a .foo file, open the file and type some text or numbers save the file, go back to the github window and commit the changes to the master. Sync the changes to push them to the server location. The image below shows the .gitattribute and .foo file of the repository.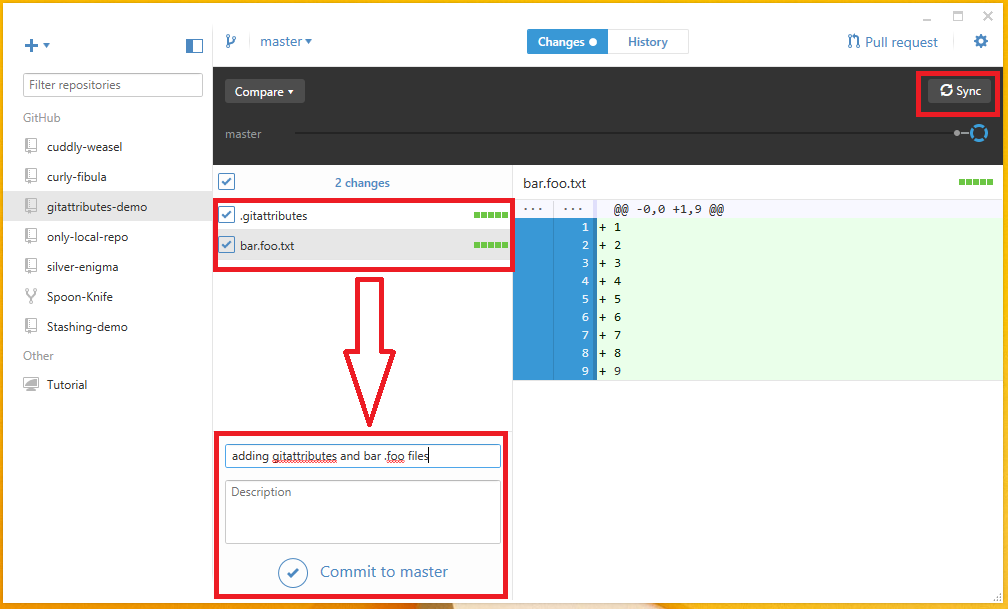
Step 6
After pushing the files to Github.com, make some changes to the bar.foo file by adding some text in between any two rows and commit the change at server location as shown in the image below.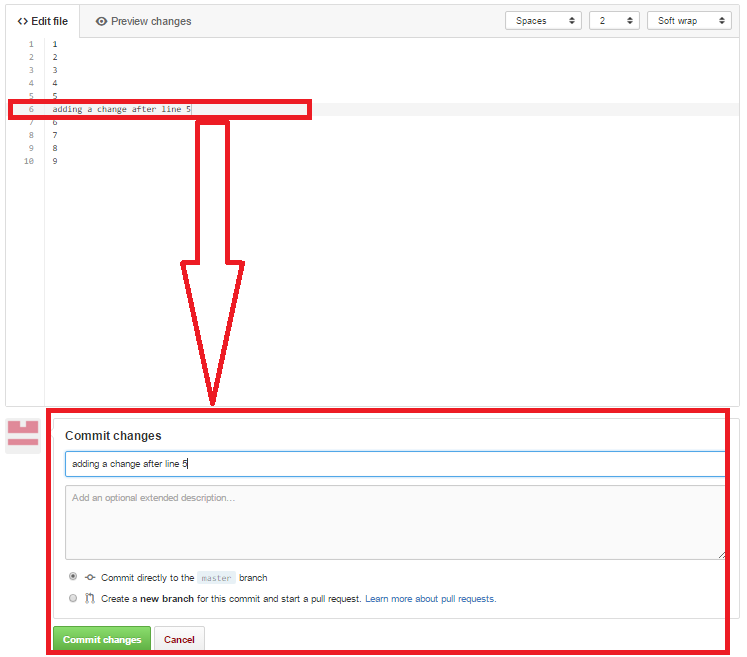
Step 7
Go back to the file location in the local repository, open the file bar.foo and add some text in the same row changed in the Github.com as shown in the image below.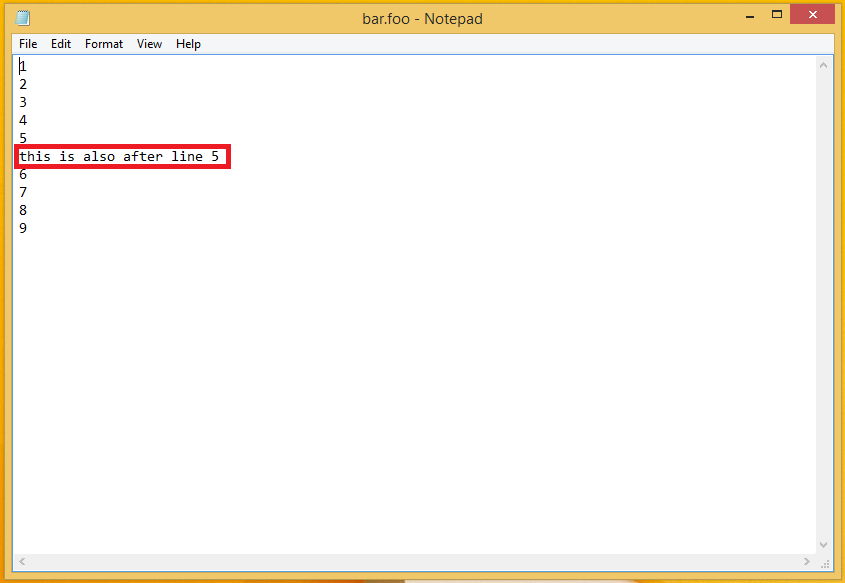
Step 8
Go back to the GitHub window and commit the changes made and then click the button sync, which pull down and push the change made at the same time. The changes can be viewed in the history and this is the simple way to add .gitattribute files to a repository.
Key Points
- Rebasing and merging are designed to integrate changes between the branches in GitHub.
- Rebasing could be dangerous but recommended as often as possible by developers.
- Uncommitted changes can be stored in Github temporarily called stashing changes.
- Files can be shared in GitHub using Gists.