


 Description
Spring Basic Example, Before proceeding with the example, make sure to set up required installed tools. Here minimum knowledge of eclipse tool and Java programming is necessary. The following are the steps every programmer has to follow while doing any Spring project.
Step - 1
Create Java project as shown in the below shown image. Open Eclipse ->File->New->Select Spring project->enter HelloSpring as project name and click on Finish.

Step - 2
Once the Project created it will be as shown in Project Explorer.
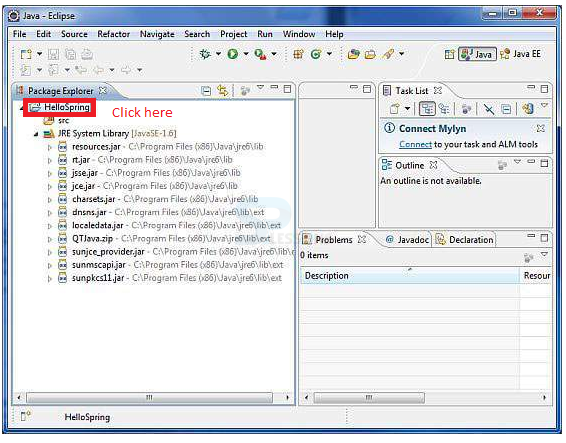
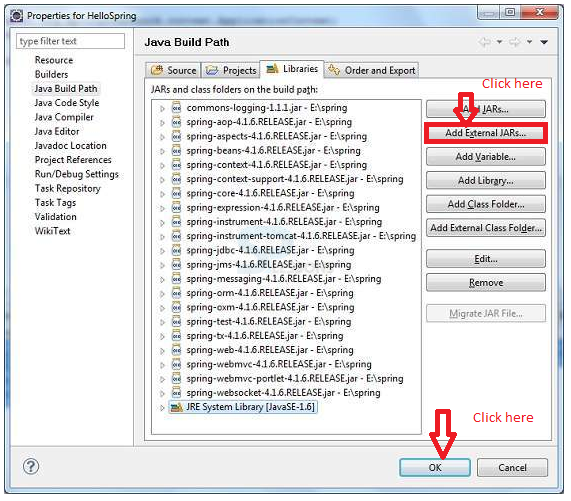
Step - 3
Include libraries into the project.By using Build path ->Configure build path .
Step - 4
Create the source file. Before creating source file, create a package and under this package write HelloWorld.java and MainApp.java.

Step - 5
HelloWorld.java
[java]
package itools;
public class HelloWorld {
private String message;
public void setMessage(String message){
this.message = message;
}
public void getMessage(){
System.out.println("Your Message : " + message);
}
}
[/java]
This code is used to display the message that is the reason here the developer has taken data member called String message.
Step - 6
MainApp.java
[java]
package itools;
import org.springframework.context.ApplicationContext;
import org.springframework.context.support.ClassPathXmlApplicationContext;
public class MainApp {
public static void main(String[] args) {
ApplicationContext context =
new ClassPathXmlApplicationContext("Beans.xml");
HelloWorld obj = (HelloWorld) context.getBean("helloWorld");
obj.getMessage();
}
}
[/java]
- Developer has to create ApplicationContext. Here ClassPathXmlApplicationContext() API will be use full to load Beans configuration.
- Here getBean() method is useful to get required bean.
Step - 7
Include Bean configuration file.
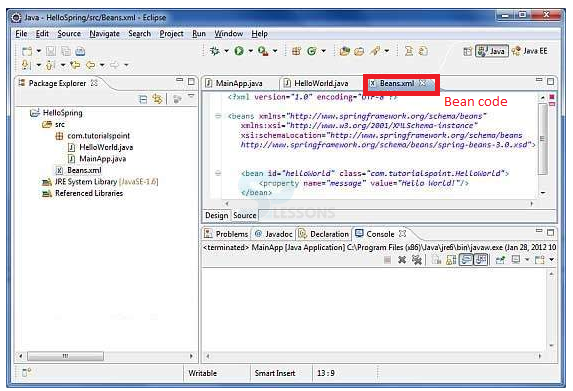 Code of Bean file will be as follows.
[java]
<?xml version="1.0" encoding="UTF-8"?>
<beans xmlns="http://www.springframework.org/schema/beans" xmlns:xsi="http://www.w3.org/2001/XMLSchema-instance" xsi:schemaLocation="http://www.springframework.org/schema/beans http://www.springframework.org/schema/beans/spring-beans-3.0.xsd">
<bean id="helloWorld" class="splessons.HelloWorld">
<property name="message" value="Hello World!"/>
</bean>
</beans>
[/java]
Code of Bean file will be as follows.
[java]
<?xml version="1.0" encoding="UTF-8"?>
<beans xmlns="http://www.springframework.org/schema/beans" xmlns:xsi="http://www.w3.org/2001/XMLSchema-instance" xsi:schemaLocation="http://www.springframework.org/schema/beans http://www.springframework.org/schema/beans/spring-beans-3.0.xsd">
<bean id="helloWorld" class="splessons.HelloWorld">
<property name="message" value="Hello World!"/>
</bean>
</beans>
[/java]
- Bean configuartion file has to be added with xml file.This file has to be kept under the directory of src as shown below.
- Spring Basic Example - The Bean.xml file will be useful to place unique ID's to various beans and to manage the initiation of objects with various values.
- While run the above application keep the Main.java in active mode then result will be as follows.
Key Points
- Spring Basic Example - Bean file and XML configuration is mandatory for every Spring program.
- Spring Basic Example - All spring libraries should be added to the eclipse tool while performing Spring program.