


 Description
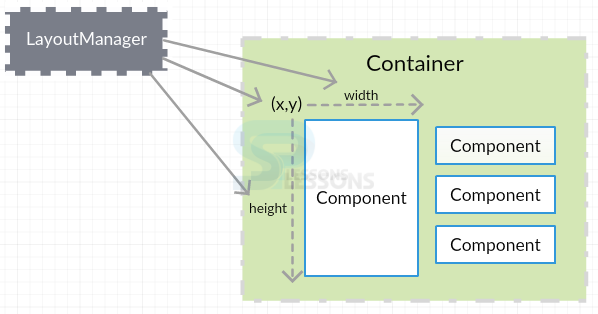
Swing Layout can be described as "arranging the available components in a proper manner" in the container. The functionality of the layout will be automatically done by Swing Layout Manager.
Layout Manger automatically arranges the components in a proper manner, even if the developer does not use Swing Layout manger components will be arranged by the default layout manager. Some times it is difficult to know the size and width of the window application so layout manager creates object to the every container. Following is the declaration of Swing Layout Manager.
[java]public interface LayoutManager[/java]
Conceptual
Figure
- GridBagLayout
- BorderLayout
- FlowLayout
- BoxLayout
- CardLayout
FlowLayout
The functionality of FlowLayout is sort the available components in sequential order and this is the default layout. FlowLayout consists of alignment fields as follows.
- public static final int CENTER---->To keep the center alignment.
- public static void int LEADING--->To identify the leading alignment of the text.
- public static void int TRAILING--->To identify the trailing alignment of the text.
Example
Below is the source code to perform flow layout in the window application.
SwingFlowLayout.java
[java]package swing;
import java.awt.*;
import javax.swing.*;
public class SwingFlowLayout{
JFrame f;
SwingFlowLayout(){
f=new JFrame();
JButton b1=new JButton("S");
JButton b2=new JButton("P");
JButton b3=new JButton("L");
JButton b4=new JButton("E");
JButton b5=new JButton("S");
JButton b6=new JButton("S");
JButton b7=new JButton("O");
JButton b8=new JButton("N");
f.add(b1);f.add(b2);f.add(b3);f.add(b4);f.add(b5);f.add(b6);f.add(b7);f.add(b8);
f.setLayout(new FlowLayout(FlowLayout.CENTER));
//setting flow layout of right alignment
f.setSize(300,300);
f.setVisible(true);
}
public static void main(String[] args) {
new SwingFlowLayout();
}
} [/java]
Create a package and import all the required packages.
[java]package swing;
import java.awt.*;
import javax.swing.*; [/java]
Create a class with the name SwingFlowLayout and create a constructor that should be same as class name and create a frame also.
[java]public class SwingFlowLayout{
JFrame f;
SwingFlowLayout()[/java]
Write the component elements and create a button to each and every component.
[java]JButton b1=new JButton("S");
JButton b2=new JButton("P");
JButton b3=new JButton("L");
JButton b4=new JButton("E");
JButton b5=new JButton("S");
JButton b6=new JButton("S");
JButton b7=new JButton("O");
JButton b8=new JButton("N");[/java]
Add the object of the buttons to the frame then components will be placed in frame.
[java] f.add(b1);f.add(b2);f.add(b3);f.add(b4);f.add(b5);f.add(b6);f.add(b7);f.add(b8);[/java]
Set the alignment of the FlowLayout as center or right or left and create the title, size to the window application.
[java]f.setLayout(new FlowLayout(FlowLayout.CENTER));
//setting flow layout of center alignment
f.setTitle("FlowLayout");
f.setSize(300,300);
f.setVisible(true); [/java]
Create the main method.
[java]public static void main(String[] args) {
new SwingFlowLayout(); [/java]
Output:
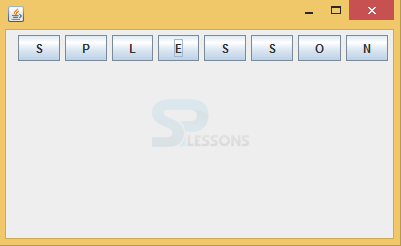
After executing the above code successfully,output will be as follows.Where all the components are in the sequential order i.e is SPLESSON.
BoxLayout
The functionality of BoxLayout arranges the components in window application as a row model or column model. The classes of BoxLayout will be found in Java. swing package. The fields of BoxLayout are as follows.
- public static final int X_AXIS or PAGE_AXIS or PAGE_AXIS
- public static final int Y_AXIS
Example
This example shows how to keep components in window at right bottom place.
BoxLayout1
[java]import java.awt.Dimension;
import javax.swing.Box;
import javax.swing.BoxLayout;
import javax.swing.JButton;
import javax.swing.JFrame;
import javax.swing.JPanel;
import javax.swing.SwingUtilities;
public class BoxLayout1 extends JFrame {
public BoxLayout1() {
initUI();
}
public final void initUI() {
JPanel basic = new JPanel();
basic.setLayout(new BoxLayout(basic, BoxLayout.Y_AXIS));
add(basic);
basic.add(Box.createVerticalGlue());
JPanel bottom = new JPanel();
bottom.setAlignmentX(1f);
bottom.setLayout(new BoxLayout(bottom, BoxLayout.X_AXIS));
JButton ok = new JButton("OK");
JButton close = new JButton("Close");
bottom.add(ok);
bottom.add(Box.createRigidArea(new Dimension(5, 0)));
bottom.add(close);
bottom.add(Box.createRigidArea(new Dimension(15, 0)));
basic.add(bottom);
basic.add(Box.createRigidArea(new Dimension(0, 15)));
setTitle("Two Buttons");
setSize(300, 150);
setDefaultCloseOperation(JFrame.EXIT_ON_CLOSE);
setLocationRelativeTo(null);
}
public static void main(String[] args) {
SwingUtilities.invokeLater(new Runnable() {
public void run() {
BoxLayout1 ex = new BoxLayout1();
ex.setVisible(true);
}
});
}
}[/java]
Create a package and import all the required packages.
[java]package swing;
import java.awt.Dimension;
import javax.swing.Box;
import javax.swing.BoxLayout;
import javax.swing.JButton;
import javax.swing.JFrame;
import javax.swing.JPanel;
import javax.swing.SwingUtilities;
[/java]
Create a class with name BoxLayout that should extend the JFrame to inherit the properties and create a constructor that should be same as class name.
[java]public class BoxLayout1 extends JFrame {
public BoxLayout1() {
initUI();
}[/java]
Create two panels, one is vertical panel and another one is horizontal panel. Vertical panel is default panel and the bottom panel is horizontal panel(x_axis).
[java]JPanel basic = new JPanel();
basic.setLayout(new BoxLayout(basic, BoxLayout.Y_AXIS));
add(basic);
basic.add(Box.createVerticalGlue());
JPanel bottom = new JPanel();
bottom.setAlignmentX(1f);
bottom.setLayout(new BoxLayout(bottom, BoxLayout.X_AXIS));[/java]
Create two buttons and provide the space between the components by using rigid area.
[java]JButton ok = new JButton("OK");
JButton close = new JButton("Close");
bottom.add(ok);
bottom.add(Box.createRigidArea(new Dimension(5, 0)));
bottom.add(close);
bottom.add(Box.createRigidArea(new Dimension(15, 0)));
basic.add(bottom);
basic.add(Box.createRigidArea(new Dimension(0, 15)));[/java]
Set the title, bounds to the window and write the function to close the window application and write the function to place the window in center of the screen.
[java]setTitle("Two Buttons");
setSize(300, 150);
setDefaultCloseOperation(JFrame.EXIT_ON_CLOSE);
setLocationRelativeTo(null);[/java]
Write the main method and create the object to the class name to visible the window application.
[java]public static void main(String[] args) {
SwingUtilities.invokeLater(new Runnable() {
public void run() {
BoxLayout1 ex = new BoxLayout1();
ex.setVisible(true);[/java]
Output:
After executing the above code successfully, output will be as follows. Where created two buttons OK and CLOSE at right bottom of the window.

GridBagLayout
The functionality of GridBagLayout is place components in rectangle, grid, where one component will be in one rectangle, grid only. The fields of GridBagLayout will be available in Java. awt. GridBagLayout class. GridBagLayout () is the constructor used to create the layout manager.
The basic difference between the GridLayout and GridBagLayout is that in GridLayout components will be in a rectangle, grid with same size, in GridBagLayout components will not be in the same size and it is not required.
Example
Below is the source code to perform grid bag layout.
GridBagLayoutDemo.java
[java]package swing;
import java.awt.*;
import java.awt.event.*;
import javax.swing.*;
public class GridBagLayoutDemo {
private JFrame mainFrame;
private JLabel headerLabel;
private JLabel statusLabel;
private JPanel controlPanel;
private JLabel msglabel;
public GridBagLayoutDemo(){
prepareGUI();
}
public static void main(String[] args){
GridBagLayoutDemo swingLayoutDemo = new GridBagLayoutDemo();
swingLayoutDemo.showGridBagLayoutDemo();
}
private void prepareGUI(){
mainFrame = new JFrame("GridBagLayout");
mainFrame.setSize(400,400);
mainFrame.setLayout(new GridLayout(3, 1));
headerLabel = new JLabel("",JLabel.CENTER );
statusLabel = new JLabel("",JLabel.CENTER);
statusLabel.setSize(350,100);
mainFrame.addWindowListener(new WindowAdapter() {
public void windowClosing(WindowEvent windowEvent){
System.exit(0);
}
});
controlPanel = new JPanel();
controlPanel.setLayout(new FlowLayout());
mainFrame.add(headerLabel);
mainFrame.add(controlPanel);
mainFrame.add(statusLabel);
mainFrame.setVisible(true);
}
private void showGridBagLayoutDemo(){
headerLabel.setText("Layout in action: GridBagLayout");
JPanel panel = new JPanel();
panel.setBackground(Color.darkGray);
panel.setSize(300,300);
GridBagLayout layout = new GridBagLayout();
panel.setLayout(layout);
GridBagConstraints gbc = new GridBagConstraints();
gbc.fill = GridBagConstraints.HORIZONTAL;
gbc.gridx = 0;
gbc.gridy = 0;
panel.add(new JButton("Button 1"),gbc);
gbc.gridx = 1;
gbc.gridy = 0;
panel.add(new JButton("Button 2"),gbc);
gbc.fill = GridBagConstraints.HORIZONTAL;
gbc.ipady = 20;
gbc.gridx = 0;
gbc.gridy = 1;
panel.add(new JButton("Button 3"),gbc);
gbc.gridx = 1;
gbc.gridy = 1;
panel.add(new JButton("Button 4"),gbc);
gbc.gridx = 0;
gbc.gridy = 2;
gbc.fill = GridBagConstraints.HORIZONTAL;
gbc.gridwidth = 2;
panel.add(new JButton("Button 5"),gbc);
controlPanel.add(panel);
mainFrame.setVisible(true);
}
}
[/java]
Create a class and import all the packages to built GriBagLayout.
[java]package swing;
import java.awt.*;
import java.awt.event.*;
import javax.swing.*;[/java]
Create a class and include required frames, labels, panes and create a constructor also.
[java]public class GridBagLayoutDemo {
private JFrame mainFrame;
private JLabel headerLabel;
private JLabel statusLabel;
private JPanel controlPanel;
private JLabel msglabel;
public GridBagLayoutDemo(){
prepareGUI();
}[/java]
Write main method and create a object to the class and use that object.
[java]public static void main(String[] args){
GridBagLayoutDemo swingLayoutDemo = new GridBagLayoutDemo();
swingLayoutDemo.showGridBagLayoutDemo();[/java]
Set the title and size of the frame and set position of header label and status label.
[java]mainFrame = new JFrame("GridBagLayout");
mainFrame.setSize(400,400);
mainFrame.setLayout(new GridLayout(3, 1));
headerLabel = new JLabel("",JLabel.CENTER );
statusLabel = new JLabel("",JLabel.CENTER);
statusLabel.setSize(350,100);[java]
Add WindowListener and WindowAdapter to the main frame and write the function to the frame.
[java] mainFrame.addWindowListener(new WindowAdapter() {
public void windowClosing(WindowEvent windowEvent){
System.exit(0);[/java]
Add header label, status label, control panel into the frame.
[java]mainFrame.add(headerLabel);
mainFrame.add(controlPanel);
mainFrame.add(statusLabel);
mainFrame.setVisible(true); [/java]
Add the text into the header label and color to the panel.
[java]private void showGridBagLayoutDemo(){
headerLabel.setText("Layout in action: GridBagLayout");
JPanel panel = new JPanel();
panel.setBackground(Color.darkGray);
panel.setSize(300,300);[/java]
Output:
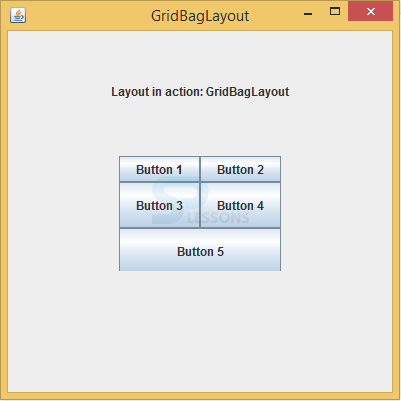
Output will be as follows. Where components are not in similar size, in GridLayout components will be in rectangle grid shape.
BorderLayout
The functionality of BorderLayout is place the components in five directions of the window such as north, south, east, center, west. Where each region may have one component. The fields of BorderLayout are as follows.
- public static final int CENTER
- public static final int SOUTH
- public static final int WEST or EAST or NORTH
Example
Below is the source code to perform border layout in an application window.
SwingLayoutDemo.java
[java]import java.awt.*;
import java.awt.event.*;
import javax.swing.*;
public class SwingLayoutDemo {
private JFrame mainFrame;
private JLabel headerLabel;
private JLabel statusLabel;
private JPanel controlPanel;
private JLabel msglabel;
public SwingLayoutDemo(){
prepareGUI();
}
public static void main(String[] args){
SwingLayoutDemo swingLayoutDemo = new SwingLayoutDemo();
swingLayoutDemo.showBorderLayoutDemo();
}
private void prepareGUI(){
mainFrame = new JFrame("Java SWING Examples");
mainFrame.setSize(400,400);
mainFrame.setLayout(new GridLayout(3, 1));
headerLabel = new JLabel("",JLabel.CENTER );
statusLabel = new JLabel("",JLabel.CENTER);
statusLabel.setSize(350,100);
mainFrame.addWindowListener(new WindowAdapter() {
public void windowClosing(WindowEvent windowEvent){
System.exit(0);
}
});
controlPanel = new JPanel();
controlPanel.setLayout(new FlowLayout());
mainFrame.add(headerLabel);
mainFrame.add(controlPanel);
mainFrame.add(statusLabel);
mainFrame.setVisible(true);
}
private void showBorderLayoutDemo(){
headerLabel.setText("Layout in action: BorderLayout");
JPanel panel = new JPanel();
panel.setBackground(Color.darkGray);
panel.setSize(300,300);
BorderLayout layout = new BorderLayout();
layout.setHgap(10);
layout.setVgap(10);
panel.setLayout(layout);
panel.add(new JButton("Center"),BorderLayout.CENTER);
panel.add(new JButton("Line Start"),BorderLayout.LINE_START);
panel.add(new JButton("Line End"),BorderLayout.LINE_END);
panel.add(new JButton("East"),BorderLayout.EAST);
panel.add(new JButton("West"),BorderLayout.WEST);
panel.add(new JButton("North"),BorderLayout.NORTH);
panel.add(new JButton("South"),BorderLayout.SOUTH);
controlPanel.add(panel);
mainFrame.setVisible(true);
}
}[/java]
Create a package and import all the required packages.
[java]package swing;
import java.awt.*;
import java.awt.event.*;
import javax.swing.*;[/java]
Create a class with the name SwingLayoutDemo and create frame, header label, status label, control panel.
[java]public class SwingLayoutDemo {
private JFrame mainFrame;
private JLabel headerLabel;
private JLabel statusLabel;
private JPanel controlPanel;
private JLabel msglabel;[/java]
Create a constructor and write main method and create object to the class and use that object to add frame.
[java]public static void main(String[] args){
SwingLayoutDemo swingLayoutDemo = new SwingLayoutDemo();
swingLayoutDemo.showBorderLayoutDemo();
}[/java]
Add the WindowListener and write the method to close the window application.
[java]mainFrame.addWindowListener(new WindowAdapter() {
public void windowClosing(WindowEvent windowEvent){
System.exit(0);[/java]
Set the text to the header label, create object to the panel and add the color to the panel.
[java] headerLabel.setText("Layout in action: BorderLayout");
JPanel panel = new JPanel();
panel.setBackground(Color.darkGray)[/java]
Output:
Output will be as follows. Where added the color to the panel that is gray dark color and the region of the components also shown in the output.

CardLayout
The functionality of CardLayout arranges the components in a sequential manner and only one component is visible at one time. Here one component will be treated as a one card, cardlayout (); is the constructor without horizontal and vertical gaps.
Example
Below is the source code to perform card Swing Layout in the window.
CardLayoutExample2.java
[java]import java.awt.*;
import java.awt.event.*;
import javax.swing.*;
public class CardLayoutExample2 extends JFrame implements ActionListener{
CardLayout card;
JButton b1,b2,b3;
Container c;
CardLayoutExample2(){
c=getContentPane();
card=new CardLayout(40,30);
//create CardLayout object with 40 hor space and 30 ver space
c.setLayout(card);
b1=new JButton("Apple");
b2=new JButton("Boy");
b3=new JButton("Cat");
b1.addActionListener(this);
b2.addActionListener(this);
b3.addActionListener(this);
c.add("a",b1);c.add("b",b2);c.add("c",b3);
}
public void actionPerformed(ActionEvent e) {
card.next(c);
}
public static void main(String[] args) {
CardLayoutExample2 cl=new CardLayoutExample2();
cl.setSize(400,400);
cl.setVisible(true);
cl.setDefaultCloseOperation(EXIT_ON_CLOSE);
}
} [/java]
Import all the required packages to inherit the properties.
[java]import java.awt.event.*;
import javax.swing.*; [/java]
Create a class and that should extend the JFrame and should implement the ActionListener. Create card Swing Layout, buttons and constructor also.
[java]public class CardLayoutExample2 extends JFrame implements ActionListener{
CardLayout card;
JButton b1,b2,b3;
Container c;
CardLayoutExample2()[/java]
Add the button names and add action listeners to the components.
[java]b1=new JButton("Apple");
b2=new JButton("Boy");
b3=new JButton("Cat");
b1.addActionListener(this);
b2.addActionListener(this);
b3.addActionListener(this); [/java]
Create the main method and write the method to close the window.
[java]public static void main(String[] args)
cl.setDefaultCloseOperation(EXIT_ON_CLOSE); [/java]
Output:
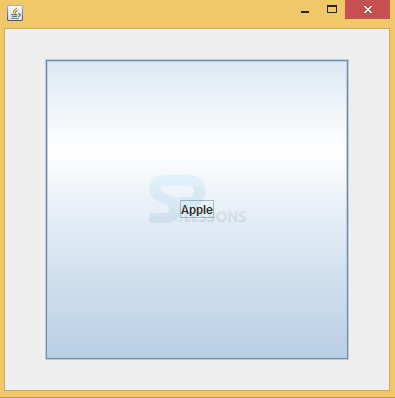
Output will be as follows. In cardlayout only one component will be visible on the window.When
click on the window remaining components will be visible.
Key Points
- GridLayout components will be in rectangle grid with same size, in GridBagLayout components will not be in same size.
- In card Swing Layout only one component is visible.
- Swing Layout manager is used to arrange the components in a sequential manner.